An exercise in how things don’t go as planned.
Some of my friends have asked what I was up to in Montana from June to December of 2018. This is an accounting of the highlights. The backstory to this is that my daughter, Alexis, and I are planning to take our artwork “on the road”. My daughter makes fiber art and I do metal art and fabrication, mainly out of welded steel. We both lean towards steampunk and retro-industrial styles, but we can do most anything. The plan is to live full-time in the RV and to tow a trailer containing a workshop and space for a small car.
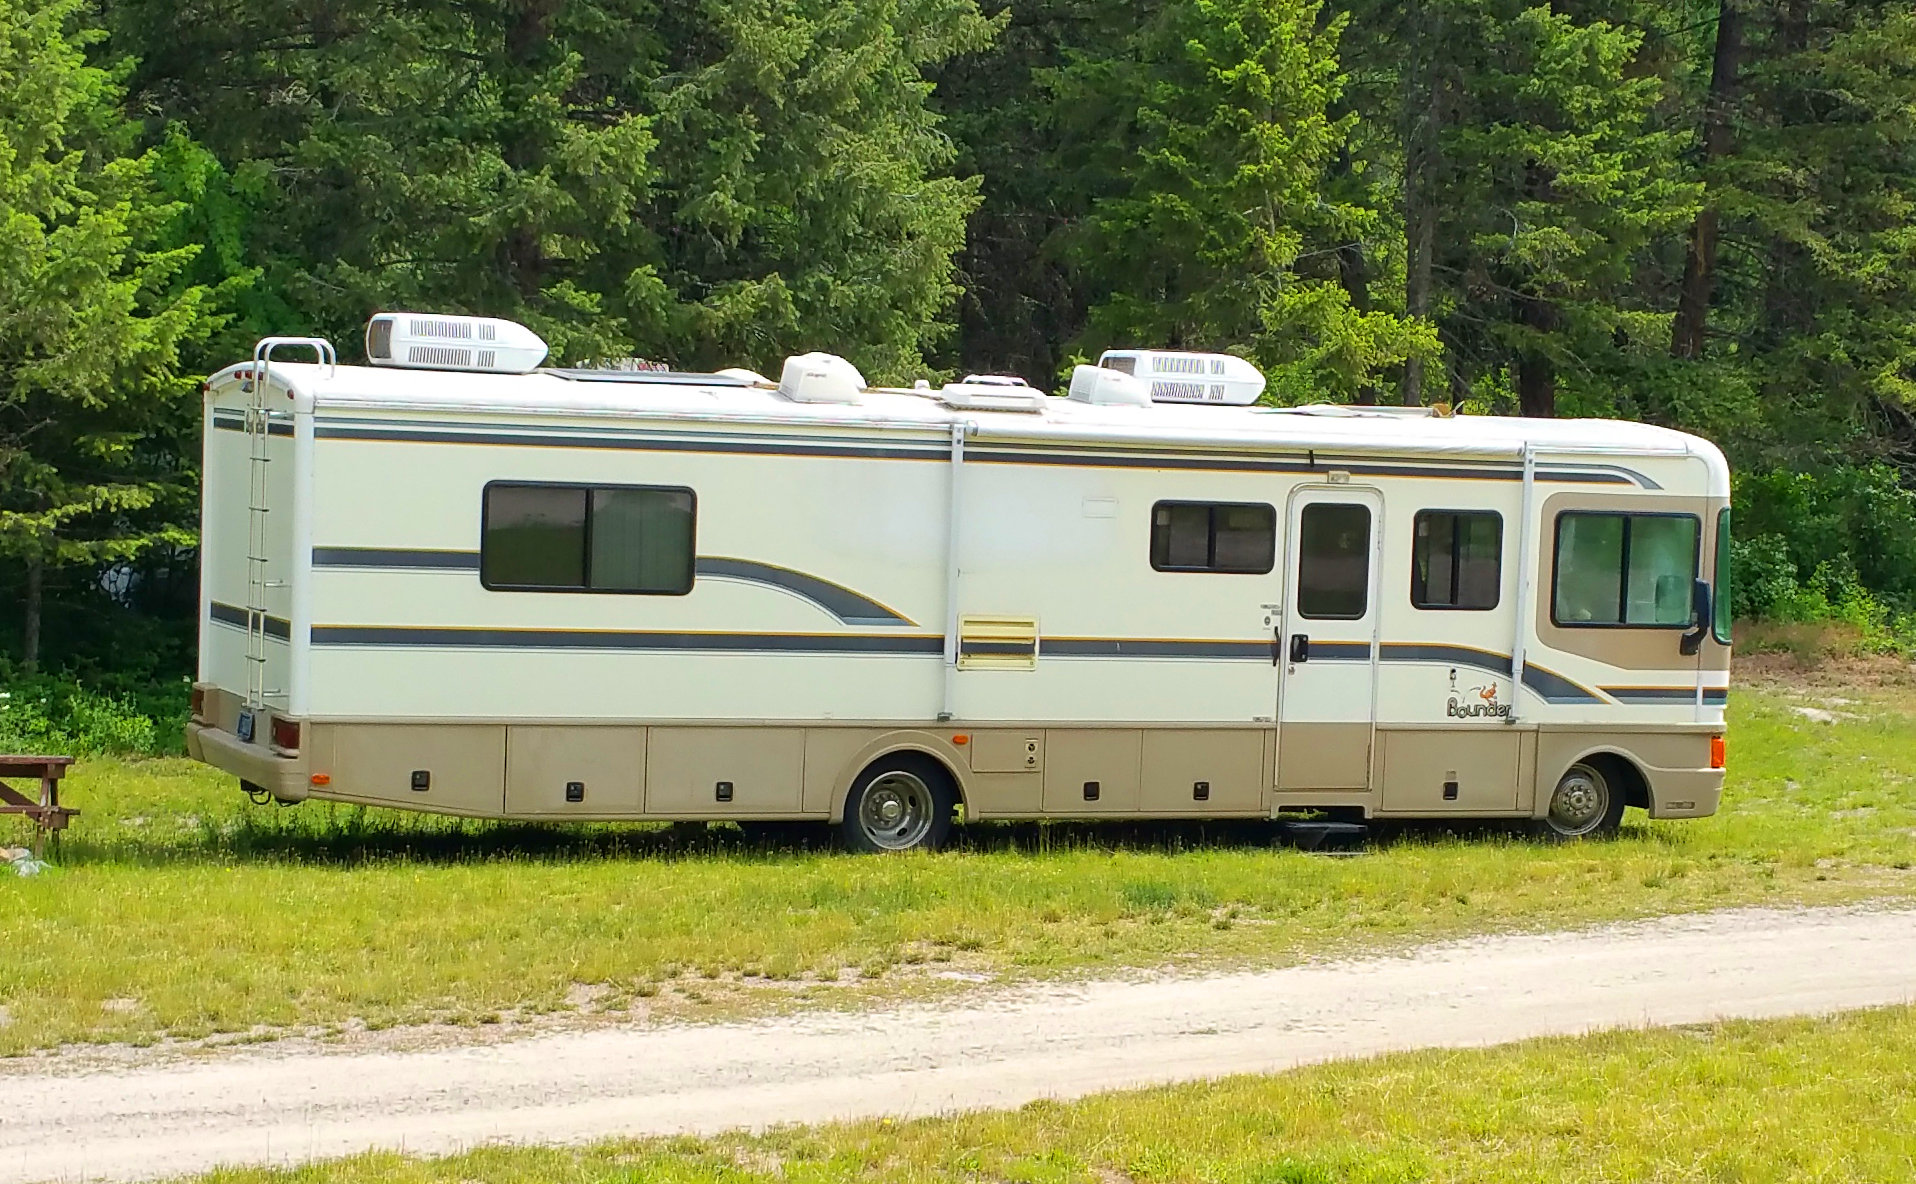
At Outback RV Park, Bigfork, MT
In June, we headed to Montana from West Virginia with a 4,000 pound trailer full of all our stuff. Upon arriving in Bigfork, Montana, I immediately got to work on the RV. The RV needed work because it had gone through the harsh Montana winter of 2017-2018 without any preparation or winterization. That means pretty much all the plumbing was busted, water heater tank burst, water pump housing cracked, fittings popped off, etc. Fortunately, the holding tanks are heavy fiberglass and had enough flex that they were not damaged, nor was the 100 gallon fresh water tank, which is made out of heavy gauge polyethylene.
This was a big project because RVs are not designed for easy servicing. Replacement of infrastructure like plumbing is a challenge. RVs are not built like boats or yachts, which have removable access panels everywhere giving access to everything. This is because boats must be fully inspectable. When you buy or insure a yacht or sailboat, you or the insurance company hires a licensed surveyor who must inspect pretty much every square inch of the boat and every fitting, including the inside surface of the hull, and write a report. RVs, even the best quality ones, are simply built from the chassis up, plumbing and wiring installed, floor installed, walls, on up to the roof. Everything is just glued and stapled shut, never to be seen again, with no consideration given to access.
Replacing plumbing requires planning and forethought in order to minimize damage. You must find clever ways to remove the old plumbing, and to insert or fish in new plumbing, through blind passages, cutting access points in strategic places as necessary. In some places, like below the kitchen sink, I decided to simply rip out the old panels and fabricate new ones that were stronger, better-looking, and removable. If somebody has to do this again, it will be easier. After all, things happen and I might have to get in there again. What’s more, this was not the first time this coach suffered freeze damage. If you play with Montana winter, these things happen.
Being an electronics engineer, I also considered the electrical systems. The RV was wired for a 120 volt/30 amp hookup and had a small five circuit breaker panel. That’s only 3,600 watts of power, maximum. The coach has two air-conditioners, but you can only run one at a time. One air-conditioner plus the microwave oven pretty much maxes out the power capacity. Since our plan is to work on the road, I will be welding and running machine tools in the trailer. That means we’ll strive to stay in RV spots with 240 volt/50 amp service. It seemed obvious to me that the coach ought to benefit from this too. Since I was going to re-plumb the coach, I might as well rewire it for 240 volts at the same time, install a new load center, provide more circuits for modern electric water heat, additional power in the galley, additional circuits for electric heating, provide for both air-conditioners to run at the same time, and so forth. After careful design, I settled on 11 circuits, which balances nicely in a 12 circuit load center, leaving one spare circuit. By the way, most everything used for this project was purchased on Amazon. The remainder was purchased at Sliters Hardware in Bigfork, Montana, which I highly recommend, and at Home Depot in Kalispell, Montana.
I began with a test. I connected a water supply to the coach’s water inlet and was greeted by water gushing out of the water heater compartment. So it began. It would be three weeks of work before any part of the water system would hold pressure.

Cracked water heater tank
After the water heater was removed and the line capped, the work became a process of tracking every water line and inspecting it. I discovered that the coach was plumbed with a combination of white PEX tubing and CPVC pipe. I thought it was odd to find a mixture of both. I found that most of the existing PEX tubing had survived and nearly all of the CPVC pipe was shattered to pieces. I decided that all the CPVC had to go in the trash, cracked or not.
Cracked CPVC pipe
Since I had 100 foot rolls of new red and blue color-coded PEX tubing, I decided to replace most of the old PEX tubing as well. The reason for this was that I was using crimp fittings to assemble the new PEX and the old PEX had been assembled using inexpensive plastic push-on fittings. I discovered that several of those plastic fittings were either loose or jammed. Since I was up to my neck in this already, I might as well get rid of any and all questionable parts and replace them with new PEX and new fittings. Push-on fittings contain springs and rubber gaskets that can age and fail. Crimp fittings don’t age and fail. Plus, the color-coded PEX looks nicer.
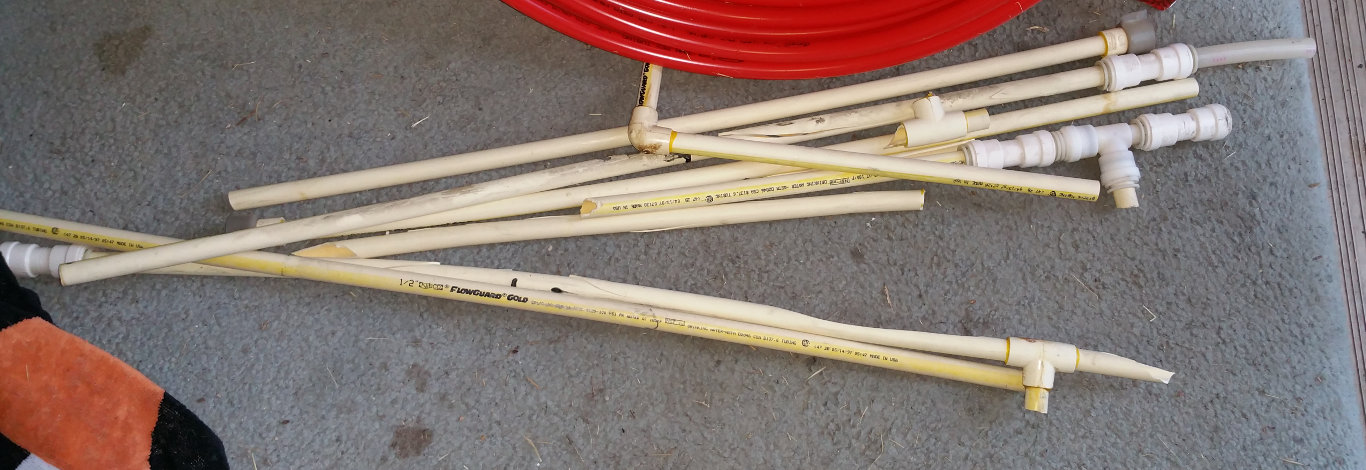
Cracked and split CPVC pipe
I later learned that the coach had originally been plumbed with CPVC which got damaged in a freeze and was partially replaced with white PEX. That’s why there was a mixture of the two kinds of pipe.
The bottom line here is that CPVC pipe is brittle and doesn’t handle freezing. I don’t recommend it.
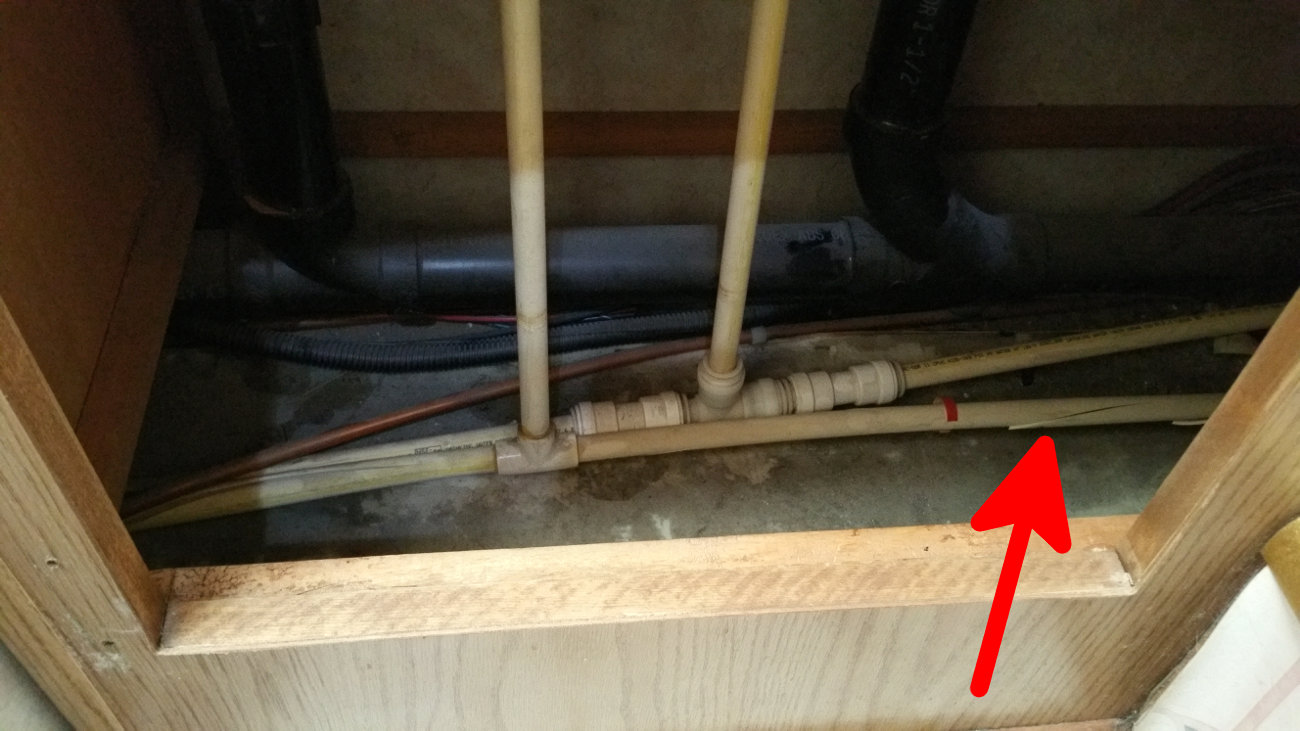
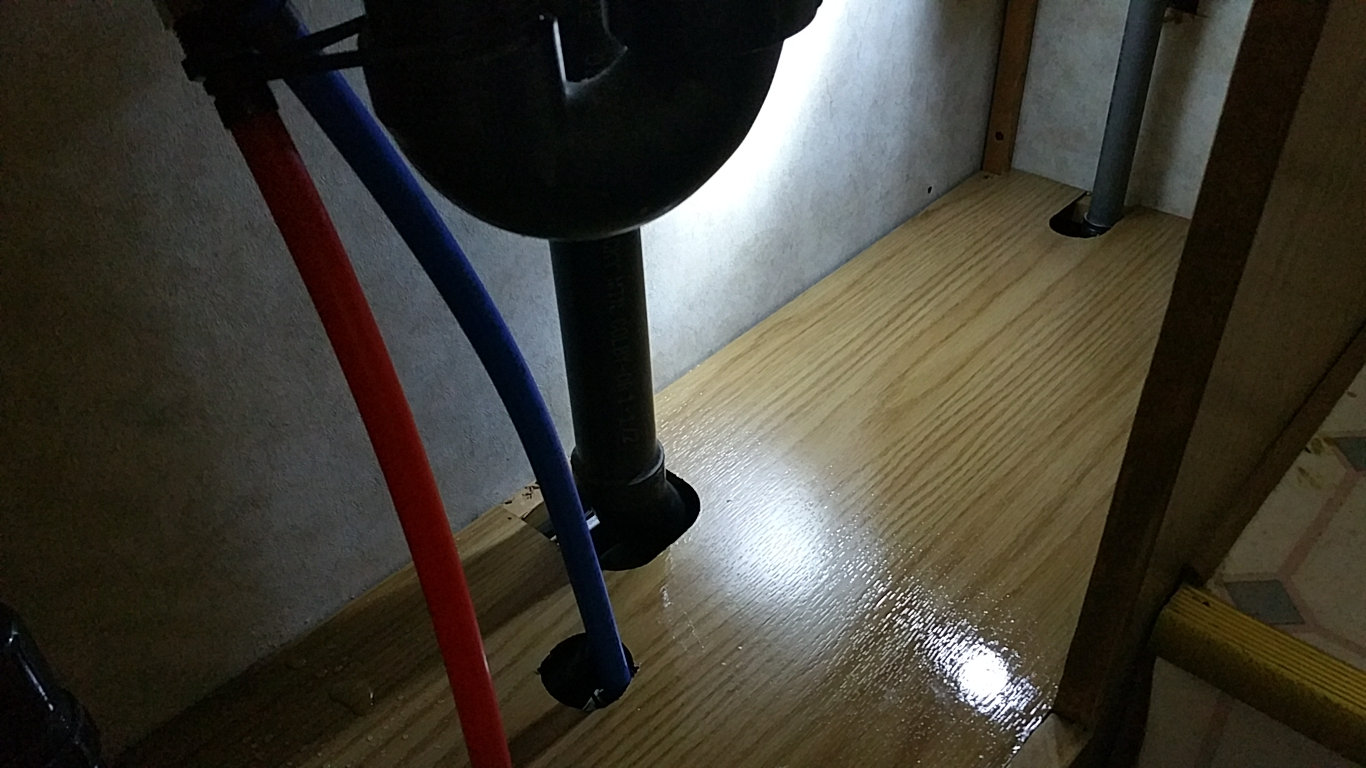
There were so many leaks and broken pipes that it didn’t really matter where I started. Nearly everything under the bathroom vanity was shattered, including the water line feeding the toilet. This seemed like a good place to begin. The plumbing here is central. Hot and cold water to and from the mains connection, bathroom, toilet, and on to the pump compartment and gas water heater passes under the vanity. Until this was fixed, nothing was going to work.

Pump compartment in its original state
Above is what the pump compartment originally looked like. This compartment contains the 12 volt water pressure pump, strainer, water heater plumbing and bypass valve, and 100 gallon fresh water tank. The compartment is situated behind and partially over the rear axle of the coach. It’s about 3 feet wide, 12 inches high, and runs the full 8 foot width of the coach. There is no access to this vitally important compartment except through a small hole for your right arm to fit through. Because of the location of the hole, you can’t use your left arm.
I found this nearly inaccessible compartment so unbelievable that I checked and rechecked. No, there were no cutouts, no hatches or removable floor panels. I checked above, raised the bed located above the compartment and checked there. I examined the floor. Nothing. One hole for your right arm. How does a three foot human arm access an 8 foot compartment and work on plumbing and electrical fittings? As time went on I thought of various clever ways to get things done in there. By the time I finished the whole project and had spent lots of time working in there, it was hardly an issue anymore. I was used to it. There was nothing I couldn’t do with the makeshift tools I invented for the work. At the beginning, it was difficult and frustrating. Making it worse was that I had recently torn my right shoulder, so I had to be extra careful.
I disconnected and removed the ShurFlo water pump so I could test it. Yes, it leaked, and the housing was cracked. I priced various options and found that I could get a brand new FloJet pump, with higher efficiency, pressure, and capacity for less money than a rebuild kit for the ShurFlo. The only downside being that the FloJet is noisier. I went for the FloJet.
As I went along, I replaced all CPVC plumbing with PEX. Some of the existing PEX seemed in good shape, so I kept it in place. One labor saving trick was to cut out whole assemblies of plumbing, which gave me templates for making new assemblies out of PEX.
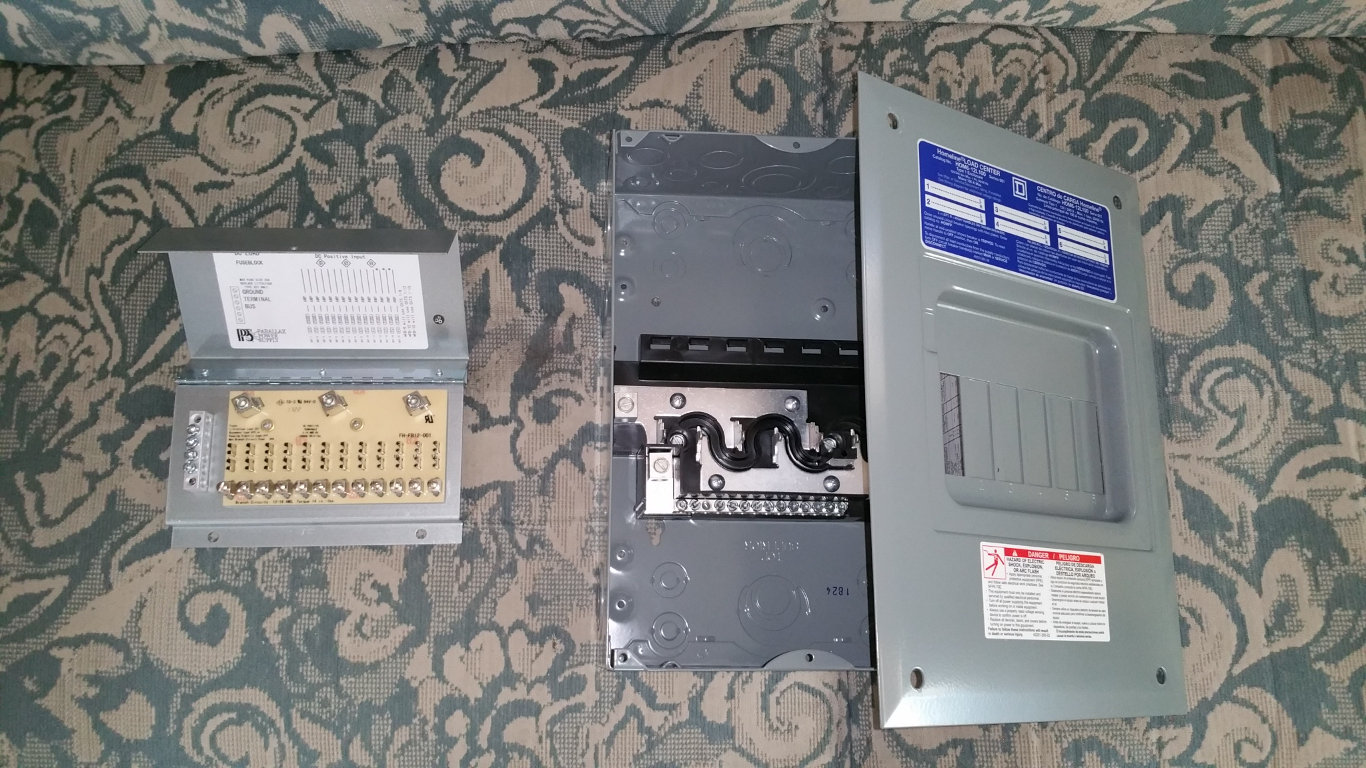
New DC and AC load centers.
I like working on more than one part of a project at once. If I hit an impasse or need to think, I can work on a different sub-project and not get stalled. So, I also began work on the electrical improvements.
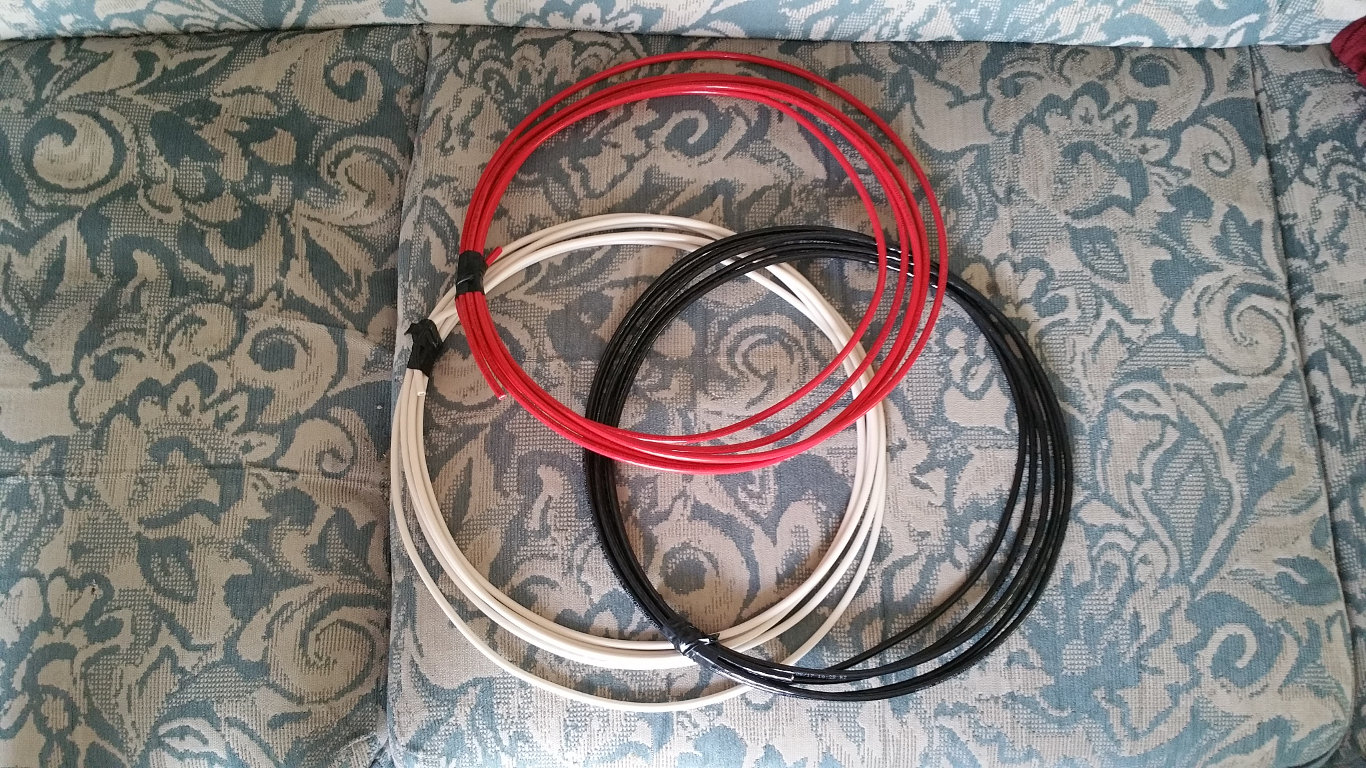
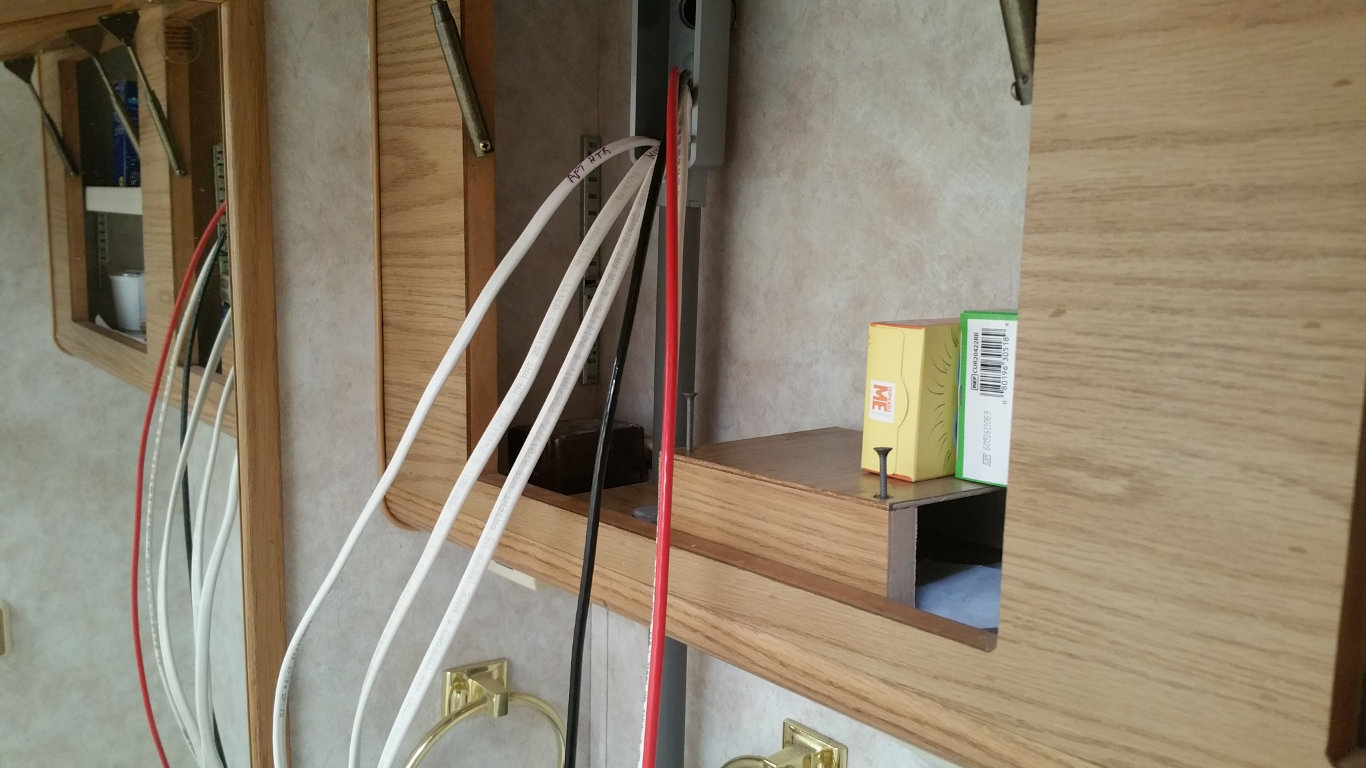
Black, white and red power wire can only mean one thing — 240 volts
Above is the new wire to run from the shore power cord box to the new load center. All three colors, black, white, and red, tells you we’re working with a 240 volt service.

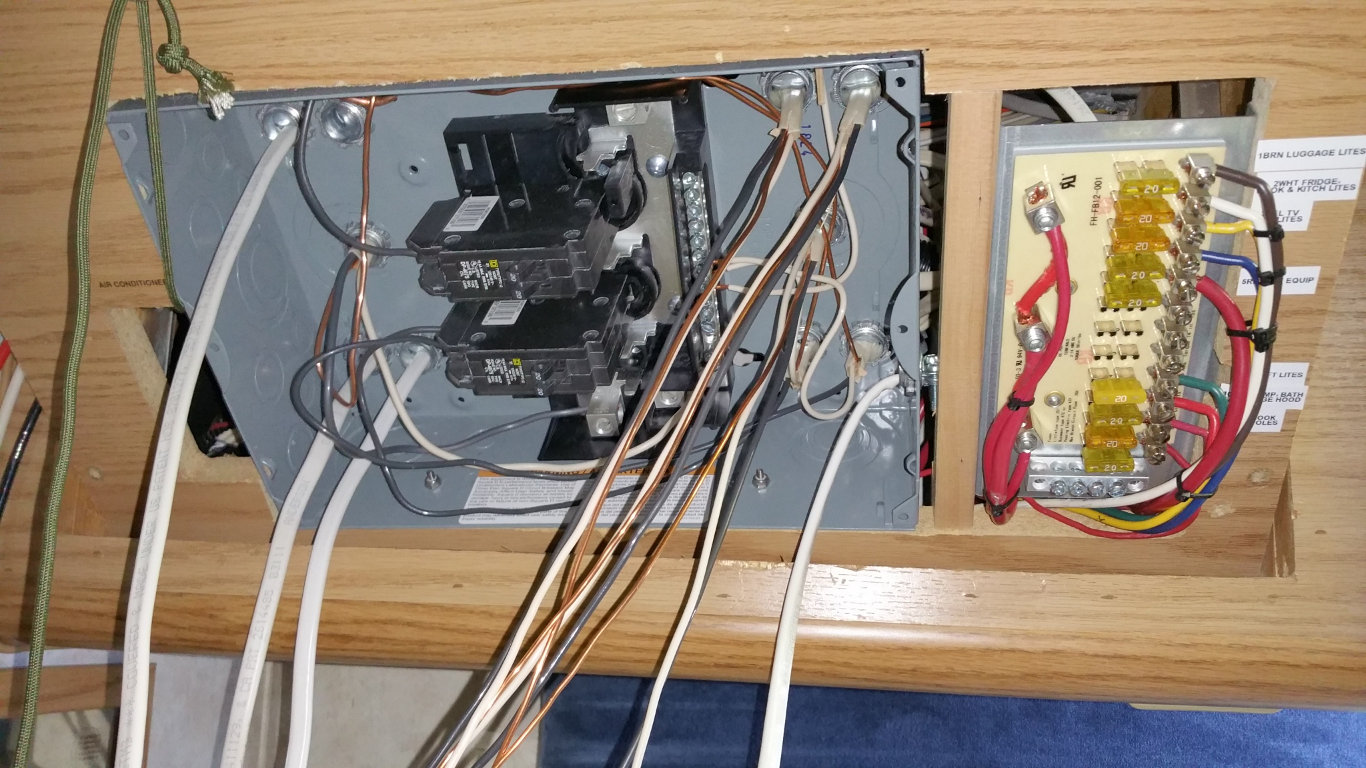
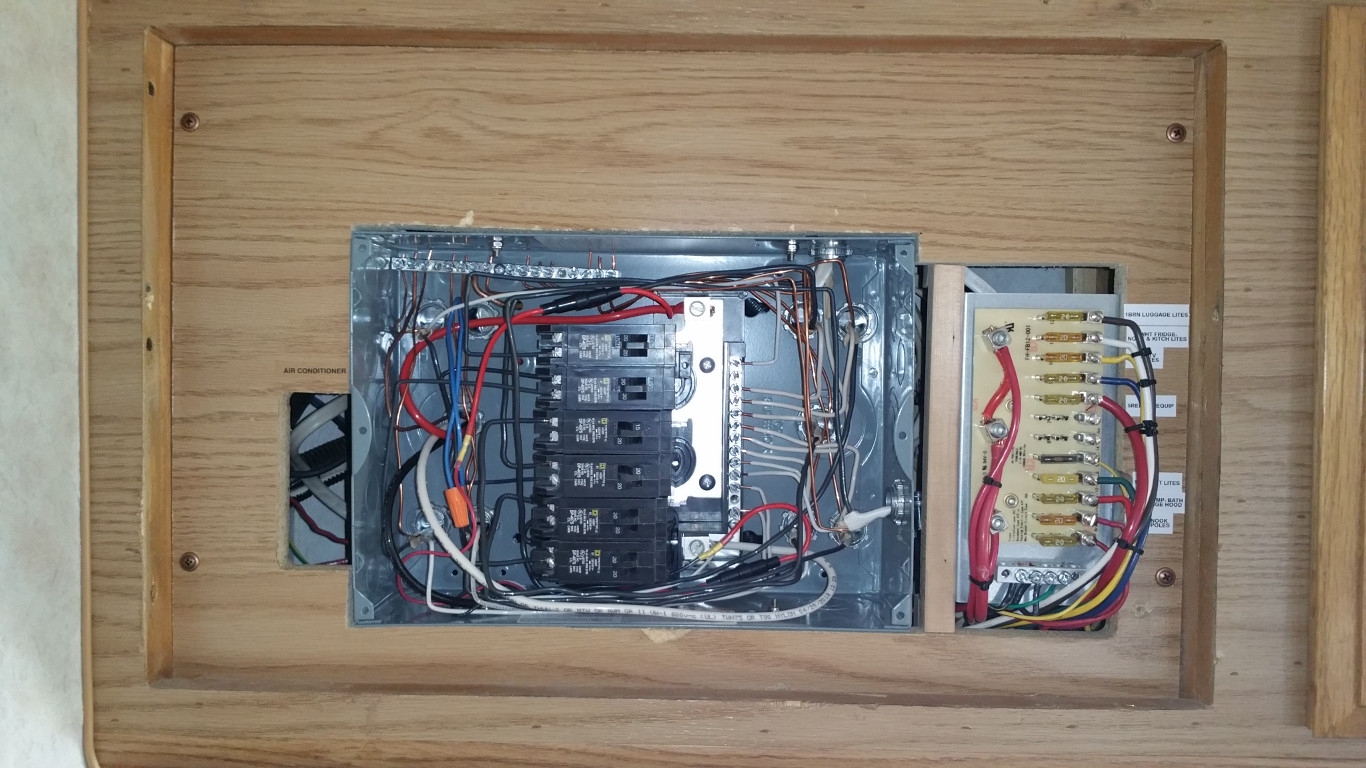
Back side of original small load centers shown after clean up but before any new circuits. (The system grew from five to eleven circuits.)
Above shows the compartment opened, the back side of the original AC and DC load centers, and the generator changeover relay.
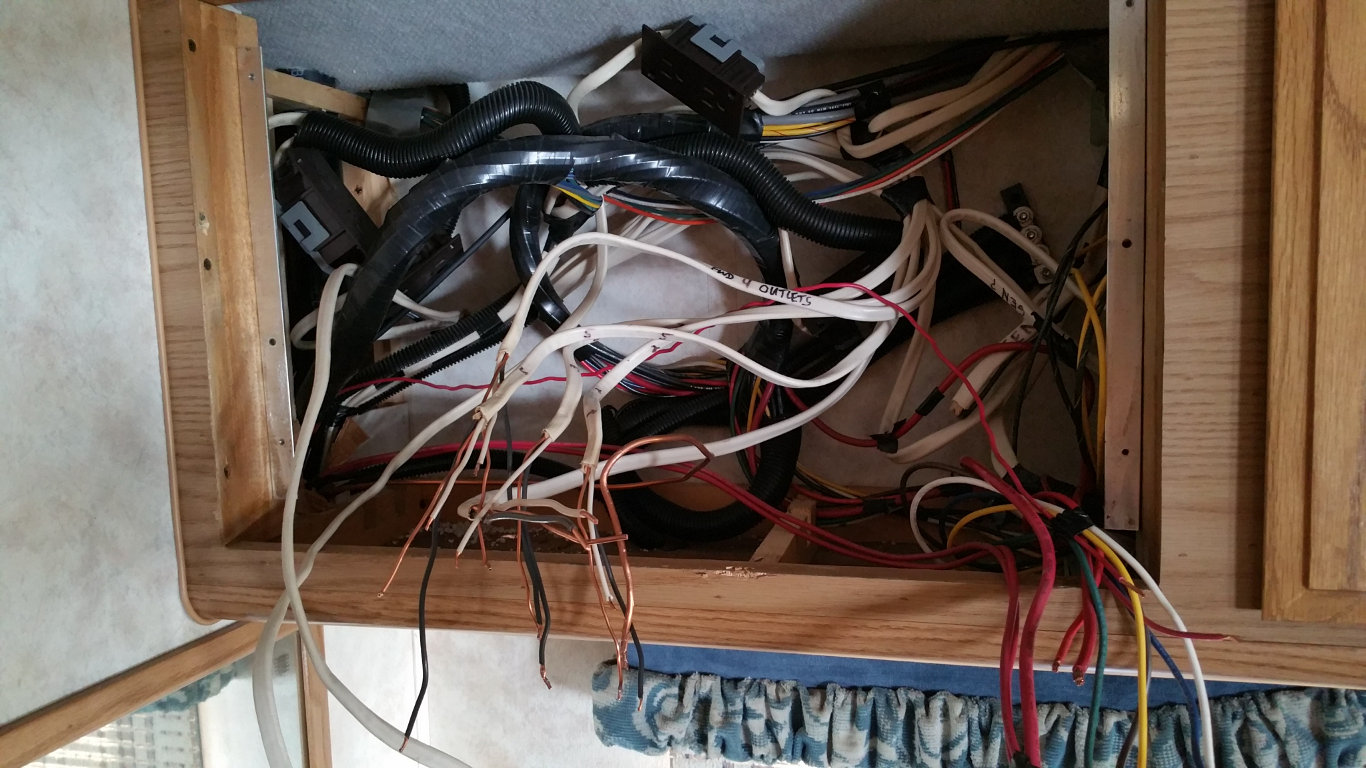
Original wiring behind load center panel
The above photo shows after the old AC and DC panels were disconnected and removed. All the wires are hanging loose. All lacing and bundling was undone and wires stretched out so I could leave service loops behind the panel. Before I began this step, everything was prepared in advance so the old panels could be removed, the new ones installed, and the DC panel at least partially wired, all in one continuous session. An RV can’t function without DC power. Lighting and pumps run on DC. One can easily do without AC power for several days, but without DC power, nothing works.
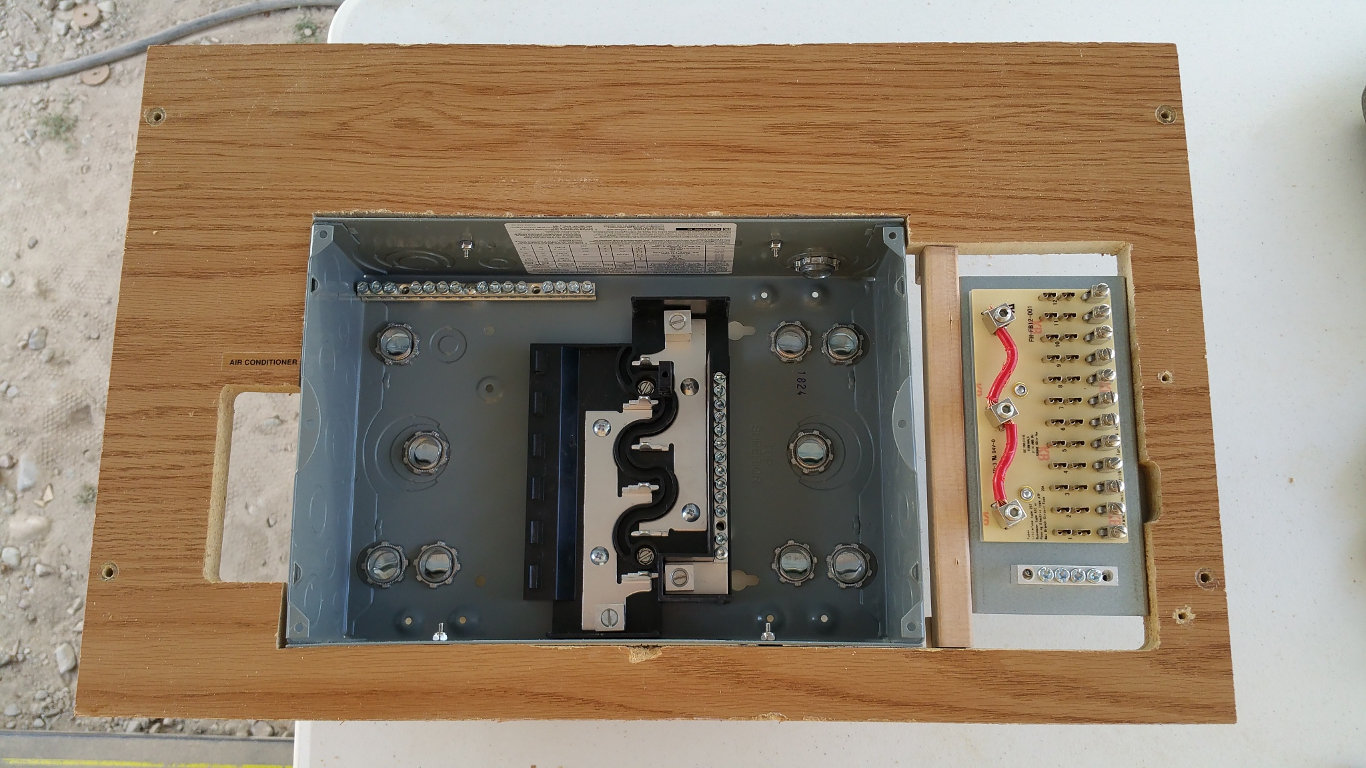
New load centers mounted in their panel
Above is the compartment cover with the larger new load centers mounted.

New DC panel
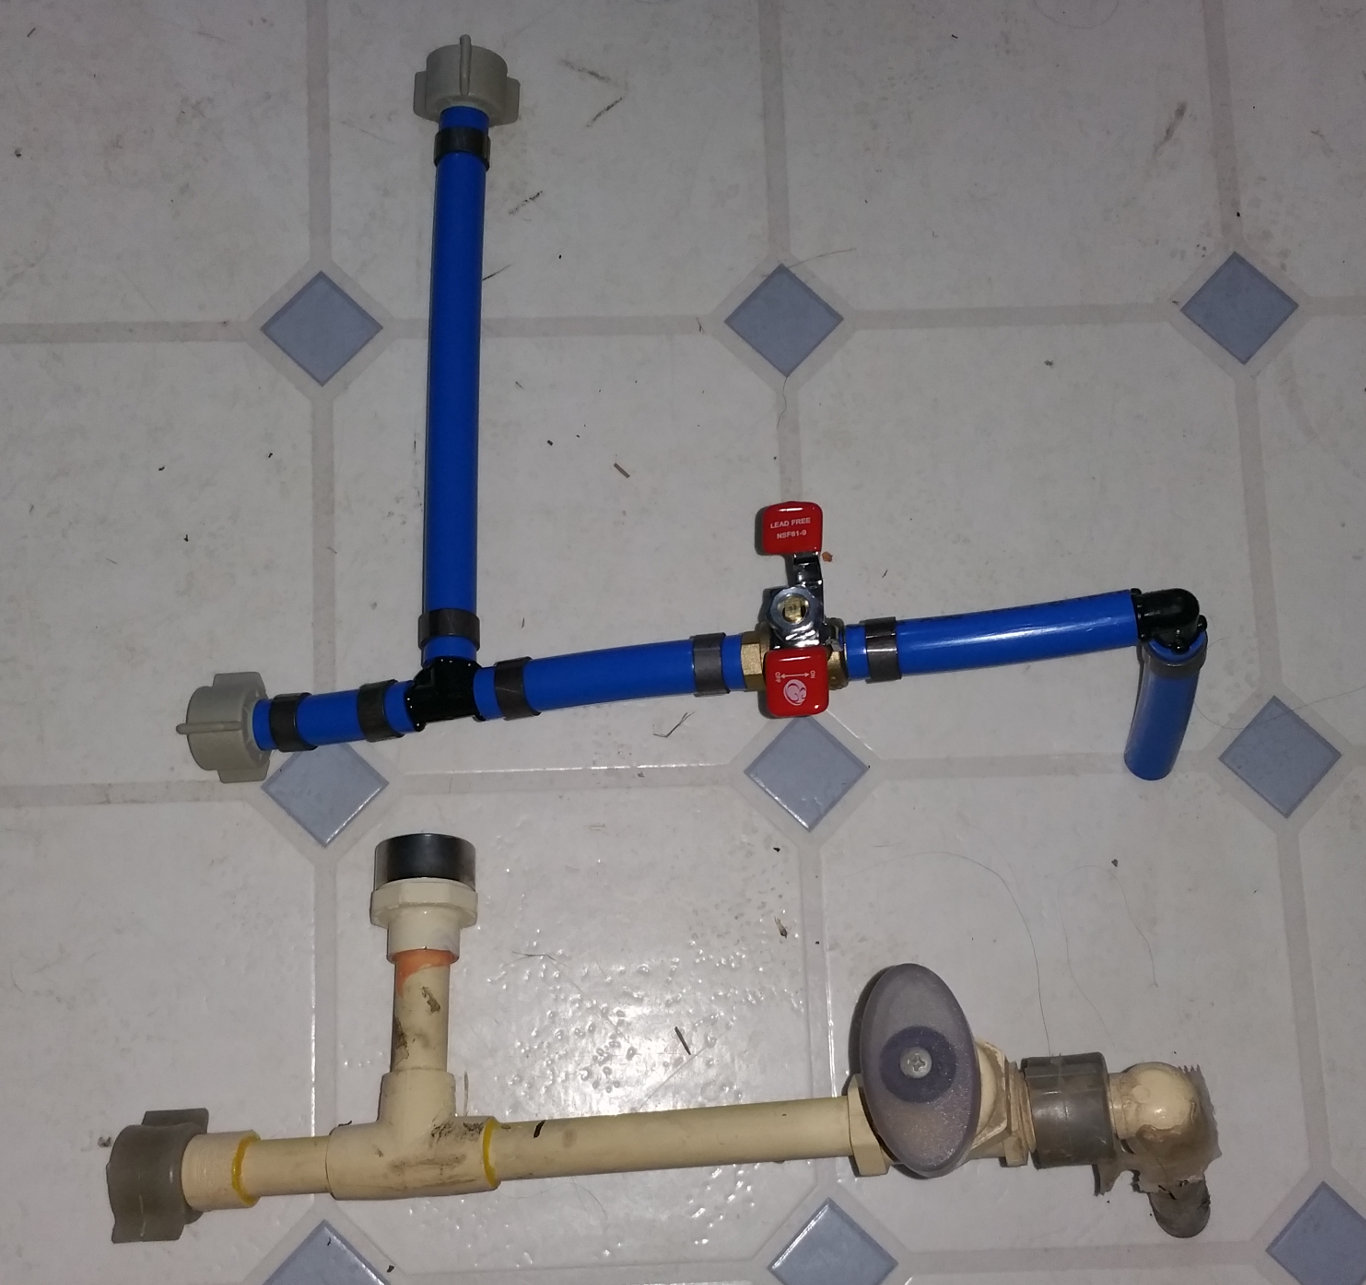
Old and new plumbing assemblies for the outlet of the fresh water tank
Above is a plumbing assembly for the outlet of the fresh water tank. The valve is for draining the tank and the other fitting feeds the pressure pump. Work proceeded day and night if possible. As mentioned above, I cut out the old plumbing as assemblies. With those as a template I fabricated new assemblies, which can be made in comfort, sitting on the couch, then installed in whatever awkward location is required.
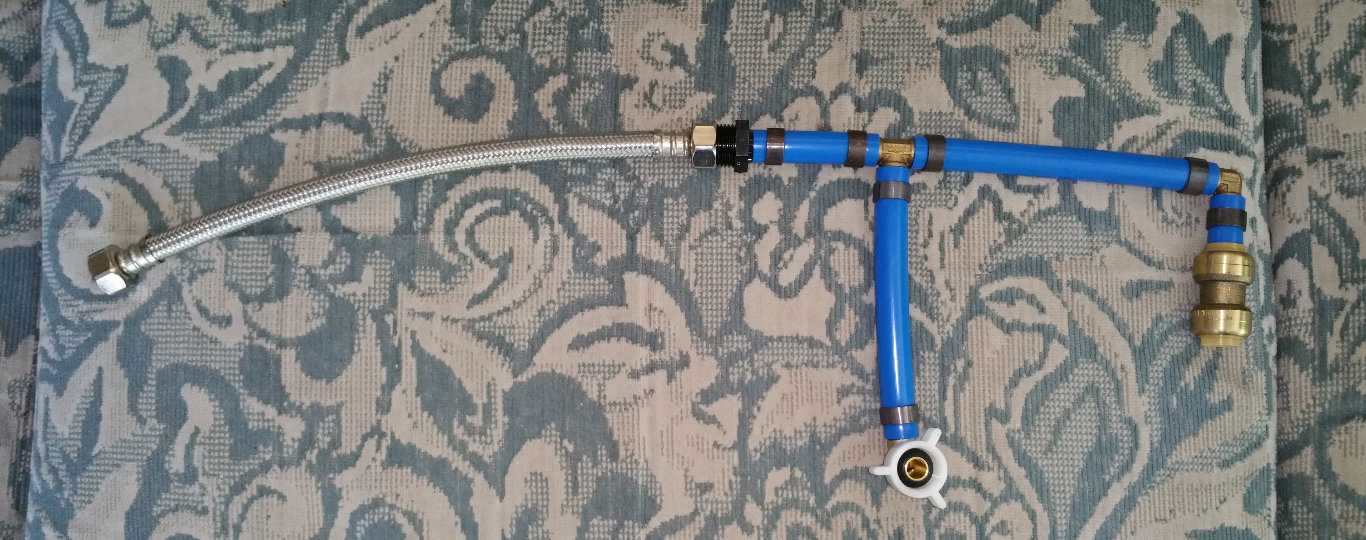
With PEX, I highly recommend making assemblies in advance rather than fabricating piece by piece in place. The tool for crimping PEX fittings is large and heavy, resembling a large bolt cutter. It won’t fit in tight spaces. Plus, you have to get both hands on it and apply a good 50 to 70 pounds of pressure to operate the mechanism. Doing all that in tight quarters is often impossible. If you plan and prepare assemblies you can usually make it work.
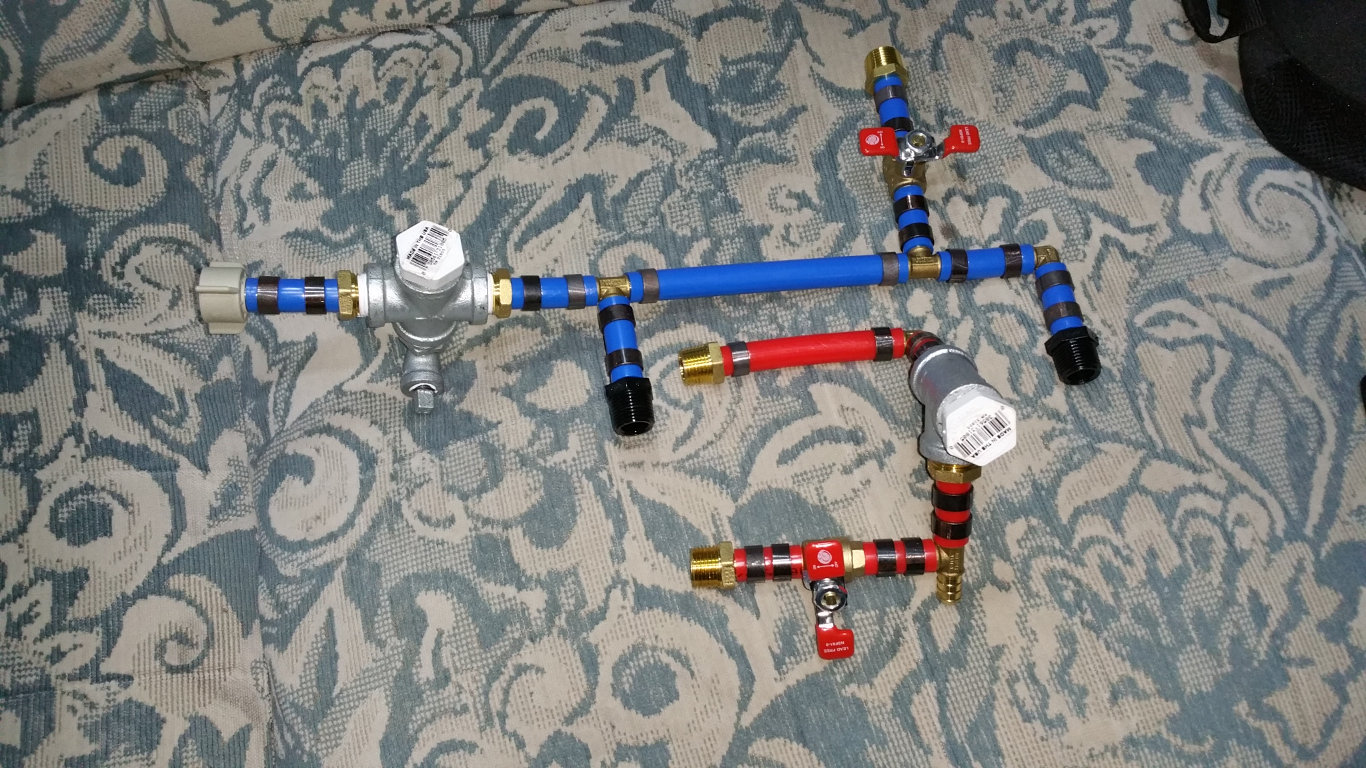
These are ready to install under the kitchen sink and ready for pressure and temperature gauges to be installed when they arrive.
Even so, there were a couple of spots where it simply couldn’t be done with crimp connectors alone and I had to use a push-on fitting to make the awkward final connection. But, I used genuine SharkBite fittings, made of brass, not plastic.
Work continued on wiring the AC load center. Pulling the wire for the new circuits and running the heavy wires for primary power turned out to be much harder than expected.
A lot of wires, both AC and DC, run from behind the load centers to the floor level of the coach, then on to their destination. The coach manufacturer used a 2×6 inch space between two wall studs as a raceway, but it was packed completely full. I couldn’t get even one more wire through. So I had to run conduit from the compartment, through the wall, into one of the bathroom cabinets, then down through the bathroom vanity, and down to where it needed to go. It’s a little unsightly but with some paint, most people won’t notice.
Conduit with power drop wires pulled.
Once down in the floor level raceway, I could run wiring to the rear of the coach.
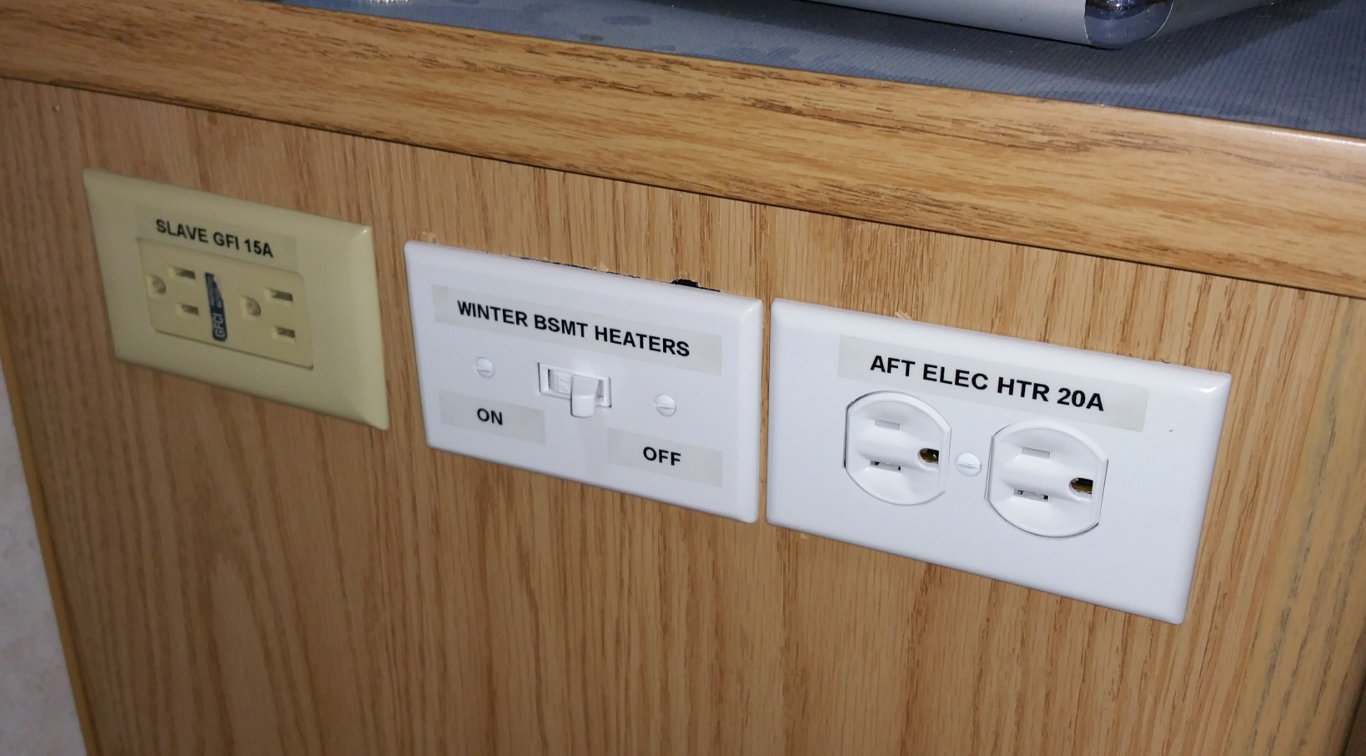
New dedicated heater circuit and switch to control basement heaters.
Dedicated electric heating circuits now run to the front and rear of the coach, as well as power for basement heating. (I’ll explain that below).
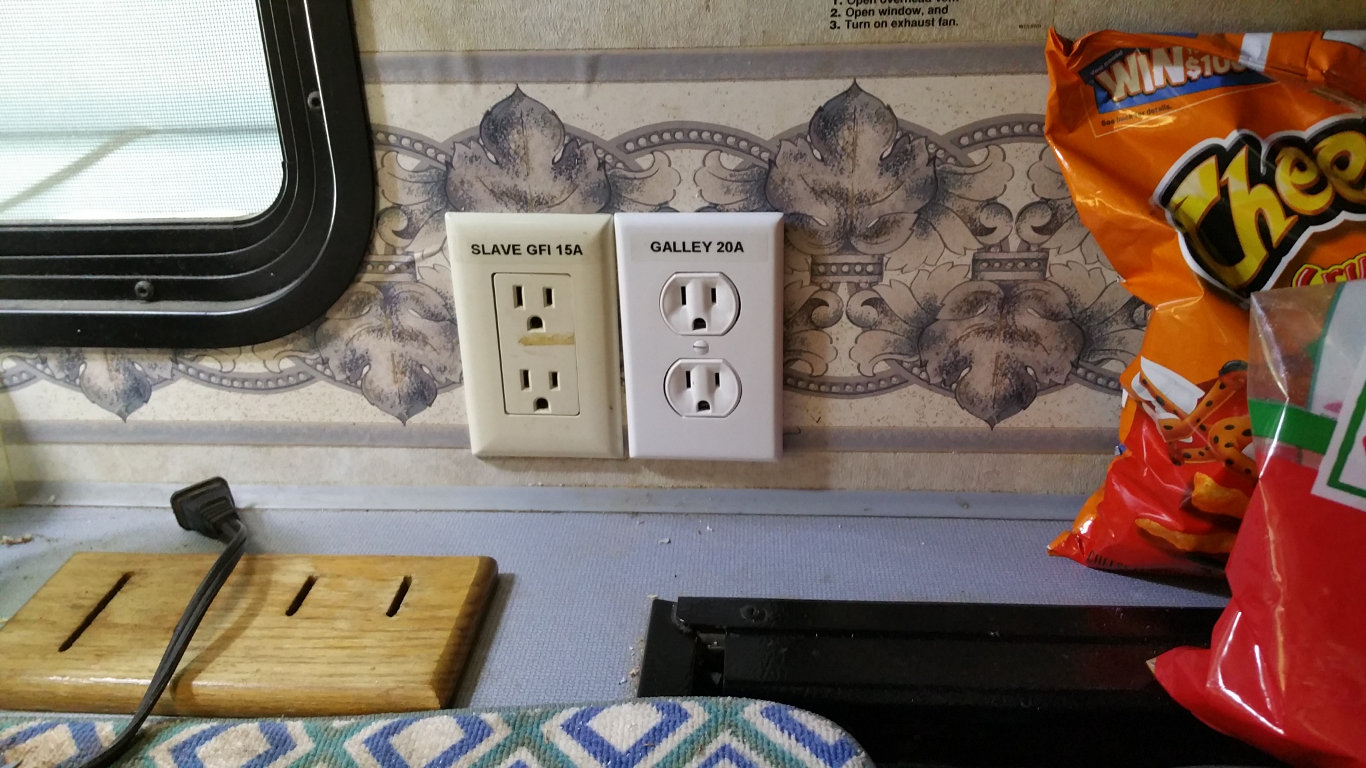
Above is a new dedicated 20 amp circuit to the galley so it’s possible to run an electric griddle or toaster, microwave, coffee pot, etc. all at once. Installing this outlet was challenging. The only place to put it was in an outside wall, next to an existing outlet. The outer walls of the coach consist of 3/8″ plywood and 2 inches of hard styrofoam insulation, cast or glued in place after the wiring was done. Running a new cable meant carefully excavating a passage through the styrofoam, behind the wall, without removing any more foam than necessary. This is harder than it sounds.
New bathroom vanity floor panel, waterproof, and removable for access.
Once the wiring was run and the plumbing replaced, the bathroom vanity could be closed up. I used a new cover panel that can be removed without cutting the plumbing pipes. Can you imagine? The old panel could not be removed without sawing it up or cutting the glued pipes. Who thought this was a good idea?
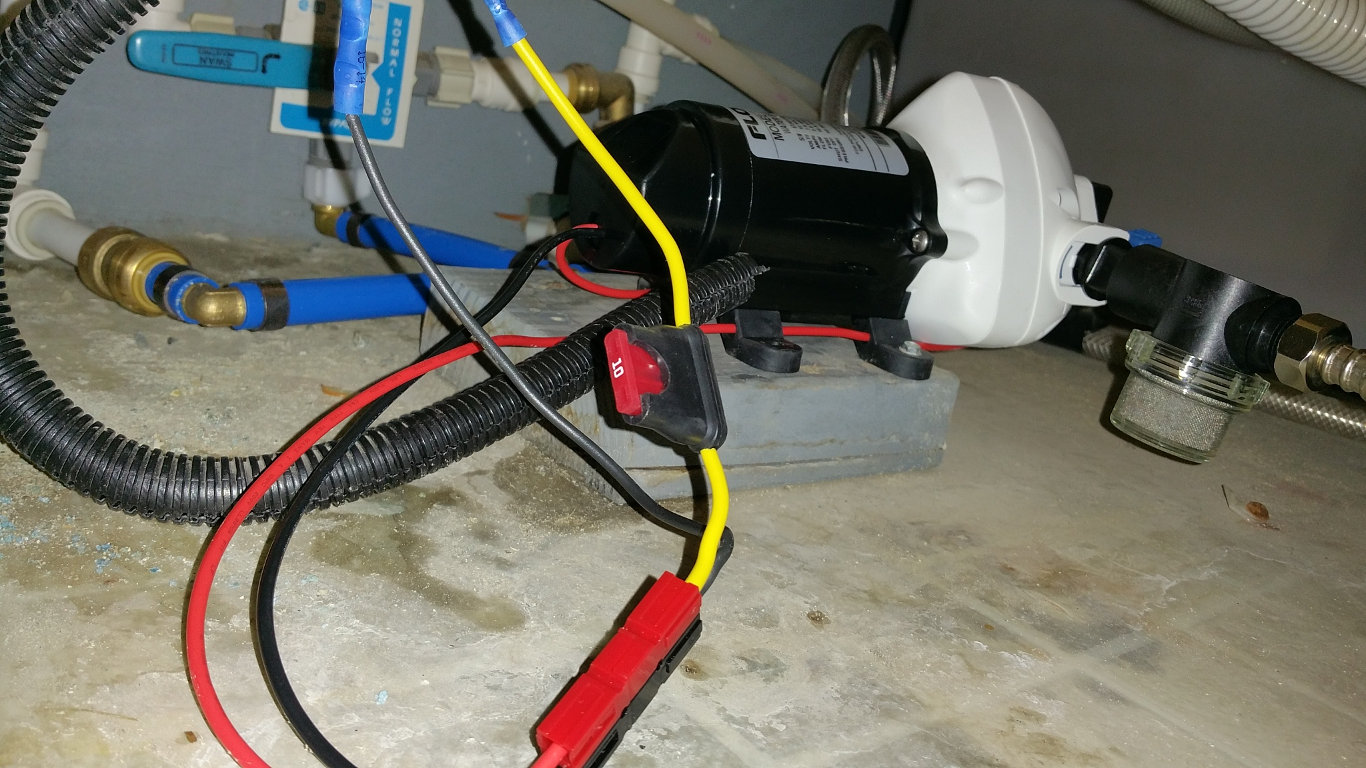
New water pressure pump
With the plumbing far enough along that some sections could take pressure, and the fresh water tank plumbing replaced, it was time to install the new water pump. As described above, the only access to this compartment, that stretches the full eight foot width of the coach, is through a hole on the left side of the coach, just large enough for my right arm. I tested the pump outside the coach. It worked fine and held pressure. I installed an Anderson Power Pole for easy connection of power, and a new fuse holder. All connections were soldered. The pump itself has quick disconnects on the water lines. Connections were made using stainless steel flex hose, instead of unyielding glued pipe. With the new arrangement, I can open the compartment and have the pump disconnected and outside in my hand in under two minutes. This will be handy if something breaks in the future or the pump fails.
Once the pump was in, it was time for the big test, and it almost passed. The pump built up to 45 pounds of pressure then silence. With an RV type pump, you know immediately if there is even a slight leak. If no leaks, the pump will remain silent indefinitely. Even a tiny leak will cause the system to lose pressure and the pump will cycle from time to time. The pump was cycling about twice a minute. There was a small leak somewhere. I tracked it down to a hose fitting on the toilet that I hadn’t tightened down enough. One more twist and the system held pressure. Now, I could proceed with more plumbing and test it incrementally.
RV water systems are equipped with drains. Winterizing an RV that will be unoccupied means draining all the water lines and either blowing them out with compressed air or filling the system with antifreeze.
I had removed the old complicated drain setup and installed a new pair of valves at the lowest point in the system. The old arrangement used lots of failure-prone plastic push-on connectors. However, removing the old drain setup meant disconnecting the water lines feeding the galley. The next step was getting those reconnected. Here was another place where I had to use SharkBite push-ons. It was impossible to crimp in that awkward spot. Once connected, I found another leak. Something underneath the floorboards under kitchen sink was leaking.
It turned out to be a plastic push-on connector. I thought about this and decided to take a gamble. The kitchen water lines ran through a small tunnel from the left side of the coach in the holding tank compartment to the right side of the coach. Could I thread in new lines? I took everything apart that was possible to take apart including access panels in the compartments underneath the galley. One of the panels, just large enough to get three fingers in, should make it possible to pull new lines through the tunnel. So I did that and ended up installing all new lines in red and blue PEX. I wasn’t expecting to have to do that, but it’s done, and it won’t leak.
I already had plans for completely re-doing the visible plumbing under that kitchen sink, installing an auxiliary electric water heater, valving, pressure gauge, and thermometers, but I didn’t have all that ready yet. I was planning to run with the existing sink plumbing until I was ready. But since I had to replace it all, I temporarily plugged the new plumbing so I could test it, but I still didn’t have a working kitchen sink.
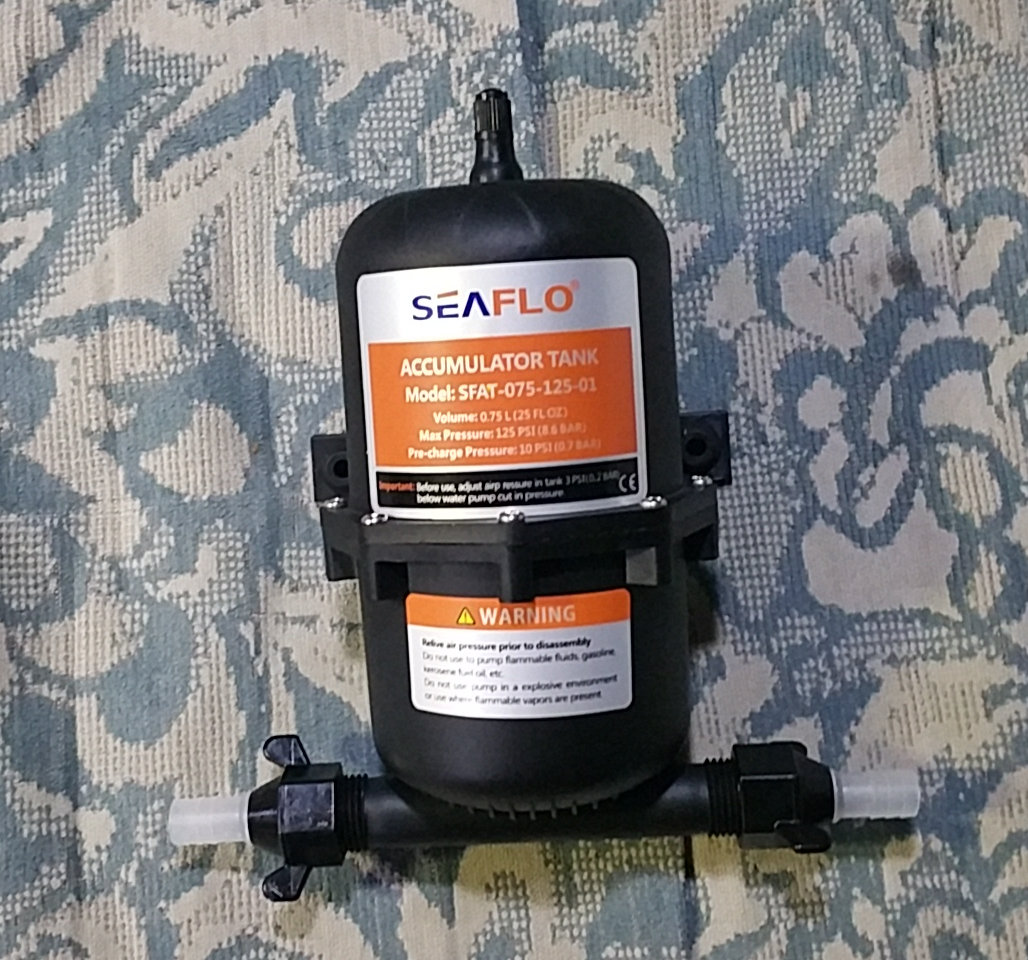
To make life easier on the water pump and because the auxiliary water heater needs an expansion tank, I installed the small Seaflo unit shown above. I think it’s 23 ounces. It helps the pump considerably, but the coach needs a larger one because of the auxiliary water heater.

From the photo above, the reader may surmise that something bad happened. It did. Really bad.
At this time of year in Western Montana, the peak of the short summer, end of July, first of August, temperatures rise to the upper 90s. It’s the hottest time of the year with no rain. One striking thing about Montana is the intensity of the sun. I’ve lived in various places in and outside of the USA, including the desert Southwest, high desert, Las Vegas, Florida, Central America, and nowhere have I experienced sun as intense as in Montana. I don’t have an explanation for it. Even in winter, with the sun low in the sky, it’s still intense. We were under a red flag fire alert. It was hot, dry, and forest fires were popping off all over the region.
On this day, I was staying at the Outback RV Park. I headed into the town of Bigfork to get some parts at the hardware store and to get groceries, then back to the coach. I parked behind the coach, grabbed my stuff, and dashed inside to escape the heat of the sun. I sat down on the couch and tore into the sub sandwich I’d brought home. After a bite or two, I noticed a strange crackling sound. I got up, looked out the door, and saw smoke streaming along, hugging the ground. I dashed out, to the front of the coach, and saw that the burn pile had caught fire, directly in front of the coach, just five feet away. I quickly called the front office of the park and informed them of the fire, then got busy. I grabbed a fire extinguisher, but, as I expected, it had little effect. I also noticed that the fire was growing explosively. Already, I could barely withstand the heat. I had to move the coach.
If I had it to do over again, I’d do some things differently. I had the generator chained to the coach, so I unlocked it and unplugged the cable. The awning was deployed and I had to stow that, otherwise it would have gotten damaged against the neighboring trailer. Then, I ran to the other side of the coach and quickly stowed the power cable so I wouldn’t run over it and wreck it. Finally, I jumped inside to start the engine, back up, and put some distance between me and the fire. When I climbed into the coach, it was chaos. The heat was already causing the windshield safety glass to shatter and explode outward. The inner plastic layer was bubbling. I jumped into the drivers seat and turned the key. Click — nothing. The chassis battery was dead. (I discovered later that the coach’s charging system only charges the main house battery bank, not the chassis battery.) Smoke was streaming up from the front of the coach as the paint charred and blistered. If I can’t get this thing started fast, I’ll lose the whole coach.
Fortunately, I’m one of those people who reads the manual. Early on, I had read all the literature and manuals for the coach and all of its systems. I remembered that there was an emergency start feature. I scanned the console. Aha! Aux Start must be it. It was a momentary rocker switch on the right side of the console. I pressed it, and nothing. I instantly realized it must be just a relay that shorts all the battery systems together. I reached across with my left hand to press the switch, and then turned the key with my right. Bingo! It started right up. Into reverse and back up. The coach moved about four feet, then stopped. I realized that my car was parked directly behind the coach and I had bumped into it.
So, I ran back outside, got in the car, started it, backed up a good ways, ran back to the coach, and backed up some more. That got the coach out of immediate danger.
In the meantime, Dale, the owner of the park had arrived and was trying to put out this massive blaze with a small garden hose. By now, the huge burn pile was fully involved and the flames were at least 50 feet high. The garden hose wasn’t having any effect. I tried to get him to spray a little water on the front of the coach to cool it off, but he refused. I then got busy moving anything that might be a hazard or be damaged away from the fire. My dog’s favorite blanket had been airing out, hanging on one of the side mirrors. It was smoking, so I threw it. My generator and gas can were too close to the fire, so I moved those to safety. The gas can was bulging and distorted from the heat radiation. All the while I was keeping a close eye on the smoking front of the coach to see if it was getting better or worse. I still had two more fully charged fire extinguishers I could use if necessary.
Finally, several units of the fire department arrived. The first was a scout truck with a 300 gallon tank, that immediately went into action. The RV park is equipped with fire hydrants so a big pumper hooked up to a hydrant on a hill above the fire. Once he got going, the fight was on in earnest. By now, the flames were forming a spinning fire tornado that must have been 75 feet high. Dale went and got the Bobcat loader and used it to turn the pile, little by little, and expose it to the water from the fire fighters. It took the fire department three hours to knock this fire down, and it was still smoking.
An ambulance came to treat any injured. I was the only injury. I had picked up some burns on my arm. I’m not sure how. My guess is I bumped the front of the coach with my arm at some point. The paramedic also noticed my forehead was burned from the heat. Adrenaline makes such things unnoticeable, but they were sure noticeable when things calmed down. There was nothing the paramedic could do. There’s no quick fix for a burn. Once they ascertained that I knew how to deal with burns, they let me go.
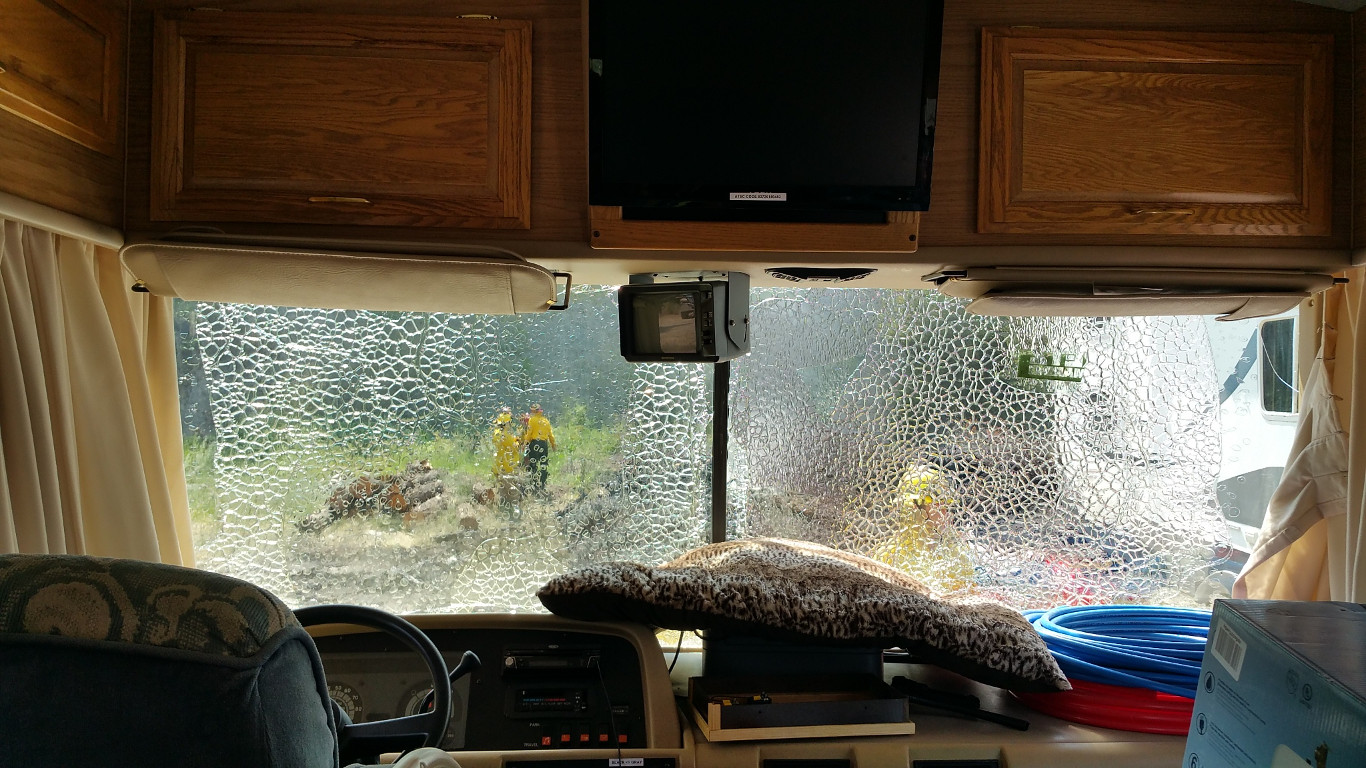
Firefighters can be seen vaguely through the damaged windshields
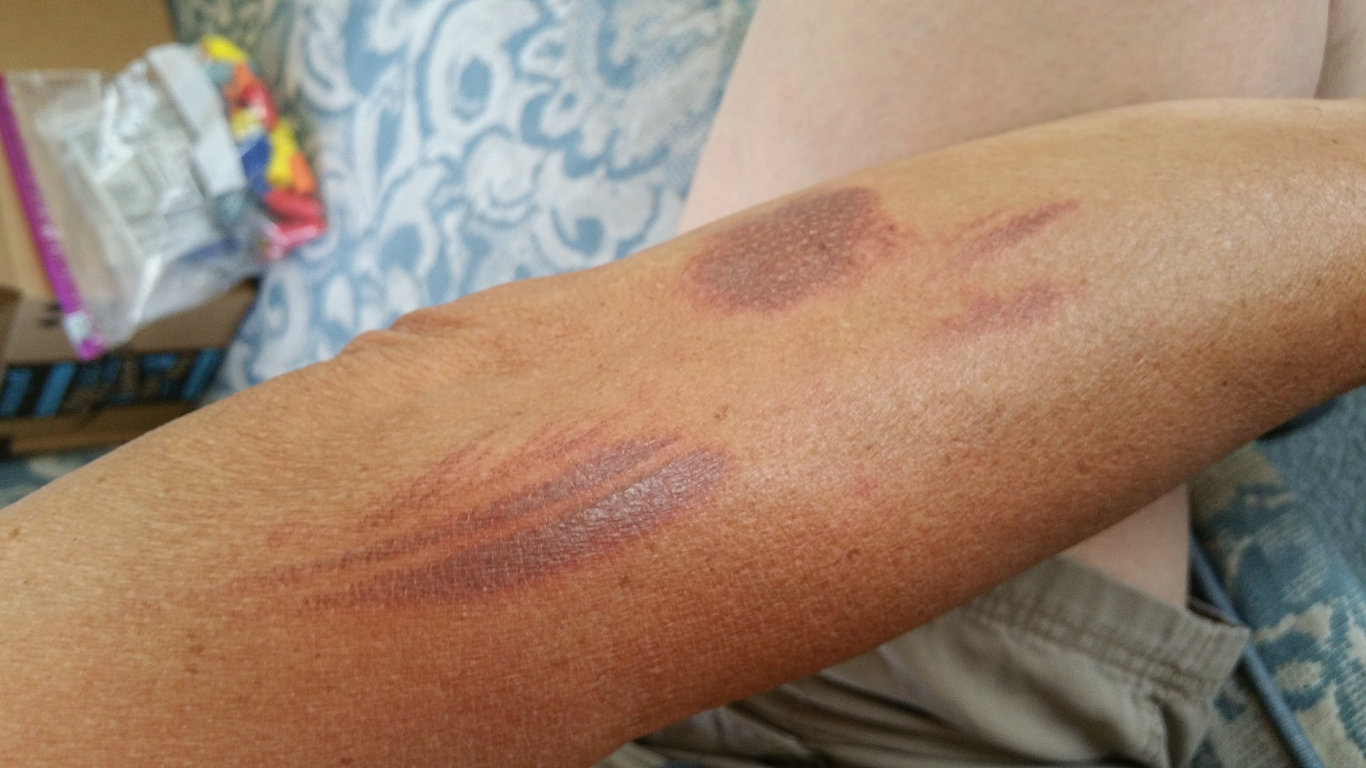
One of several burns I sustained during the fire.
The fire was so large and intense because the burn pile hadn’t been burned in a long time and there was a large amount of dry fuel ready to burn. It’s easy to ignore burn piles and just let them get bigger and bigger. Burn piles have to be burned from time to time. Another problem is that after enough time passes, the material at the bottom begins to compost, which generates heat that can lead to fire. That’s what we believe started this fire. There was no known cause. As far as we know, I was the only person in the vicinity. It’s still a mystery.
The fire stink continued for a couple of weeks. Fire department personnel came out a couple of times each day to check on it. I went out about three times a day and scanned the whole area with my IR thermometer gun, looking for any hot spots. I never saw anything over 120 degrees F.
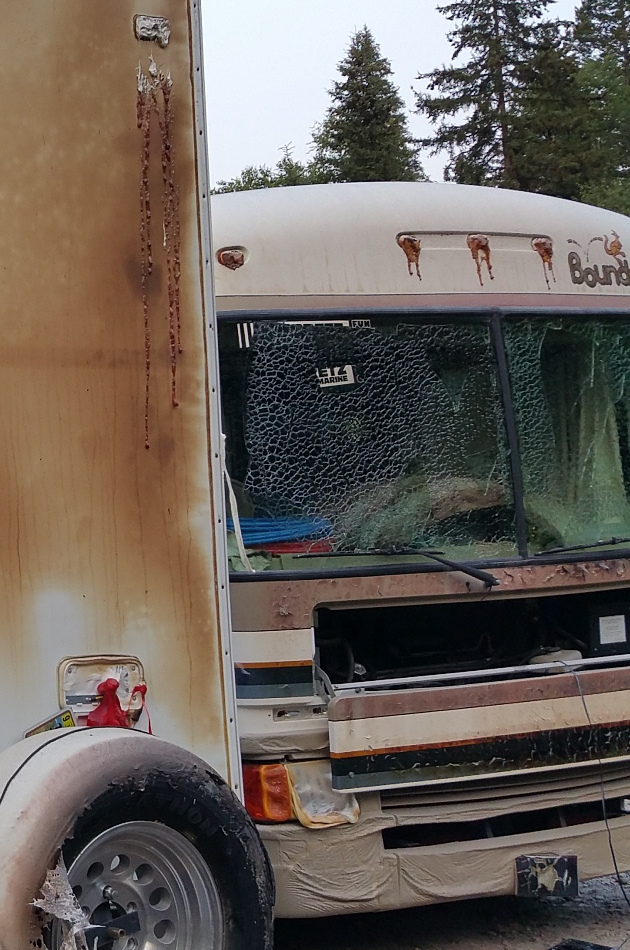
So, that was the fire episode. Unfortunately, the fire severely impacted my project and costs. It also disabled the coach from being driven on public roads until the windshields are replaced. That was not in the budget. All the lighting was melted, so the coach was not legal on the road until that’s fixed. And the body work to restore the coach to normal is significant.
The above photo shows radiant heat damage to an adjacent trailer. Damage was all superficial. In the photo it looks like warpage occurred on the rear of the trailer, but it didn’t. It’s perfectly flat. Nevertheless, Geico totalled it, claiming $18,000 to repair.
Heat caused plastic to soften and sag.
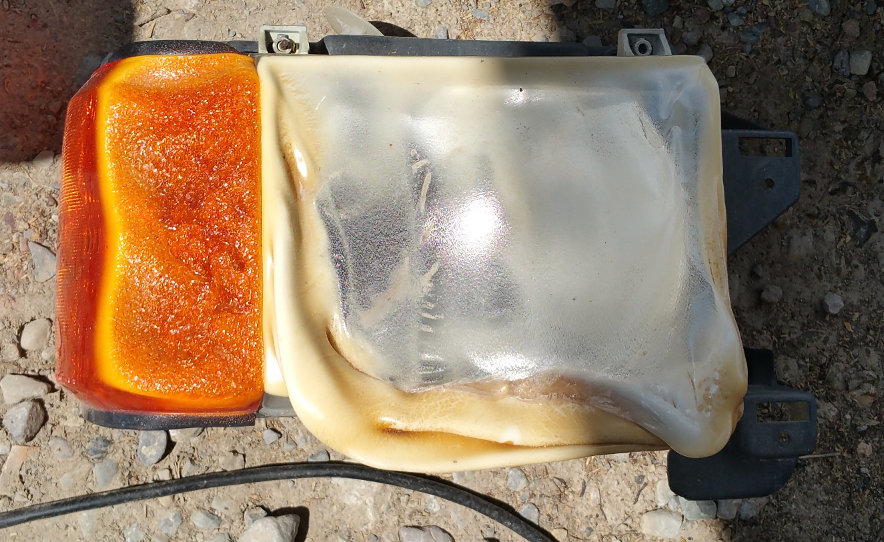
The headlights didn’t like the heat.
Lessons learned: 1) never block the coach’s escape route unless there’s no choice. 2) If I had this to do over again, the first thing I’d do is back the coach up. To hell with being a good citizen and reporting the fire first, which was ingrained in me from childhood. To hell with anything that might get damaged while I save my own stuff.
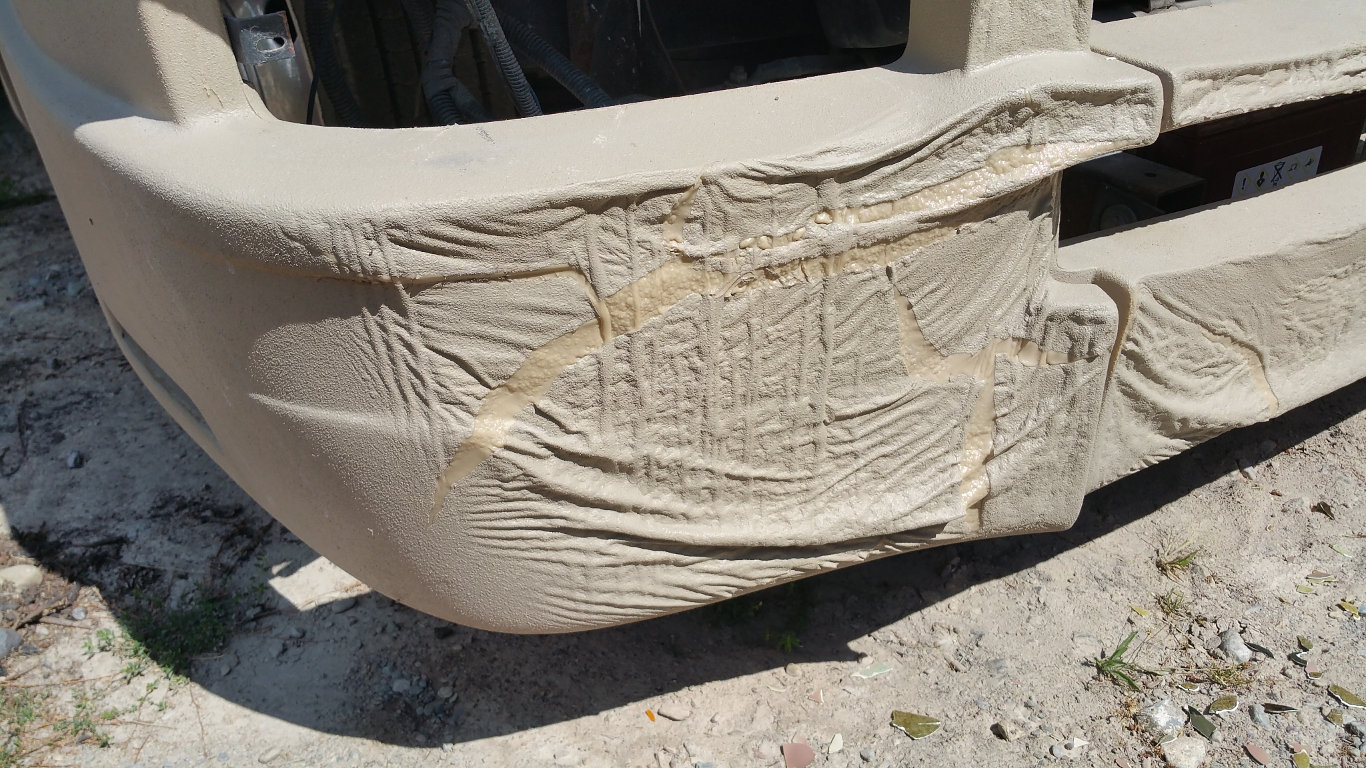
I immediately began research into the realities of fixing the bodywork. Much of the lighting is standard. The headlights are from a 1991 Ford F-150 pickup. I removed much of the grilles and hardware to provide better access and tried to determine the type of plastic used for the roto-molded bumpers and end caps. The original maker, Fleetwood, had gone out of business and was bought by another company. All older records were lost so they had no idea what kind of plastic it was. After various tests, I decided it was basically ABS. Buying replacements was not in the budget. They wanted $3,000 just for the center section of the bumper. So, no. A heatgun can be used to reshape the plastic and modern body fillers should do a fine job if my artistic skill is adequate. (That remains to be seen.) The end result won’t look exactly like the original, but nobody will notice when it’s done.
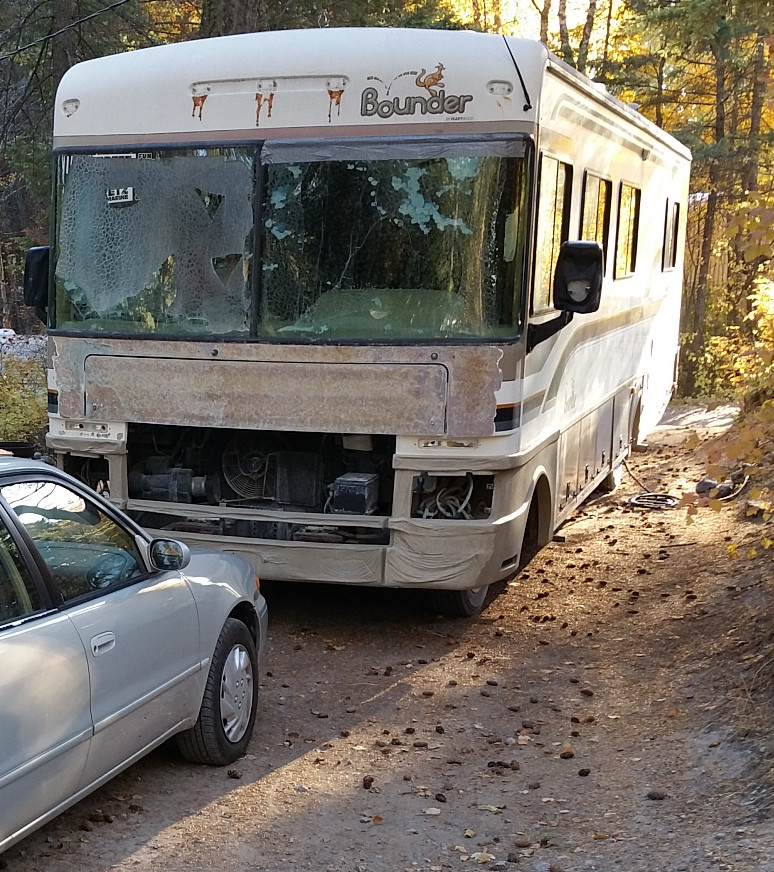
In the first photo, which was taken while the fire was still burning and right after the front of the coach stopped smoking, one can see the peeled “paint”. That’s actually gel coat and paint. Fixing all that is straightforward but takes lot of work. Gel coat is very tough and has to be ground off down to bare fiberglass before repair can be done. Fortunately, none of the underlying fiberglass was harmed by the heat.
While doing this research and gearing up for the many hours of grinding required, I continued on the plumbing and electrical projects already underway.
New dedicated heater circuit and switch to control basement heaters.
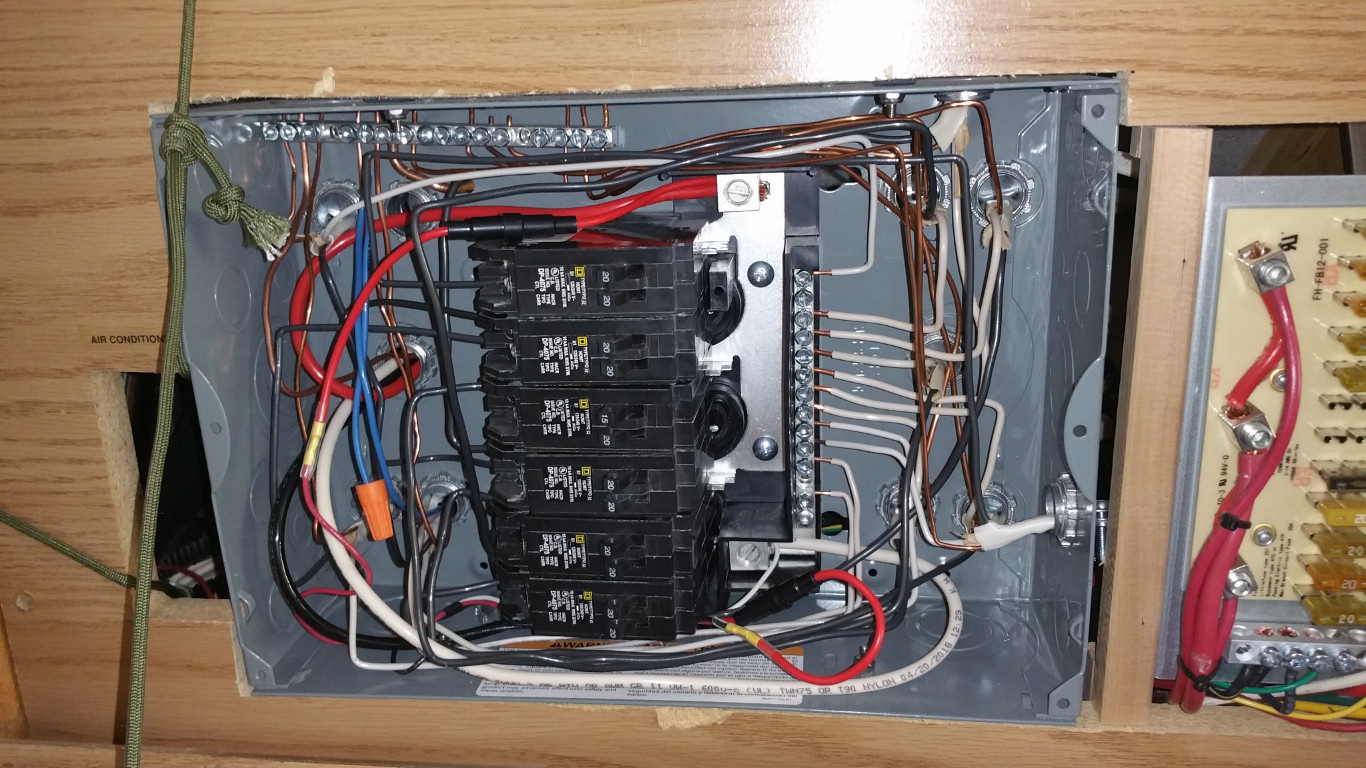
The above photo shows the new load center, all wired up. An experienced eye may notice a couple of odd things. The light blue wire is to power the aft water heater. It’s capped off because the heater doesn’t exist yet. And, what are those inline fuse holders doing in there? Hmm.
Above is another view of both AC and DC load centers. I wanted to have my own power monitoring panel for AC and DC. I moved the charge controller indoors, where it’s easily seen and accessible. Seeing the house battery charge mode and battery voltage tells me everything I need to know about the DC system. I also wanted my own AC power monitor and metering so I can see what’s going on and have a cross-check of the electric meter in an RV park. The AC monitors are connected to the raw AC feed, ahead of any breakers, and are wired with 20 gauge wire. So, there are two 1/2 amp fuses for that. The current sensing transformers not visible. They’re on the main power wires behind the box. Some RV parks have wiring problems, bad ground, loose neutral, broken receptacle, etc., so my monitor panel is designed to let me plug in and observe before turning on any breakers and exposing the coach to bad power.
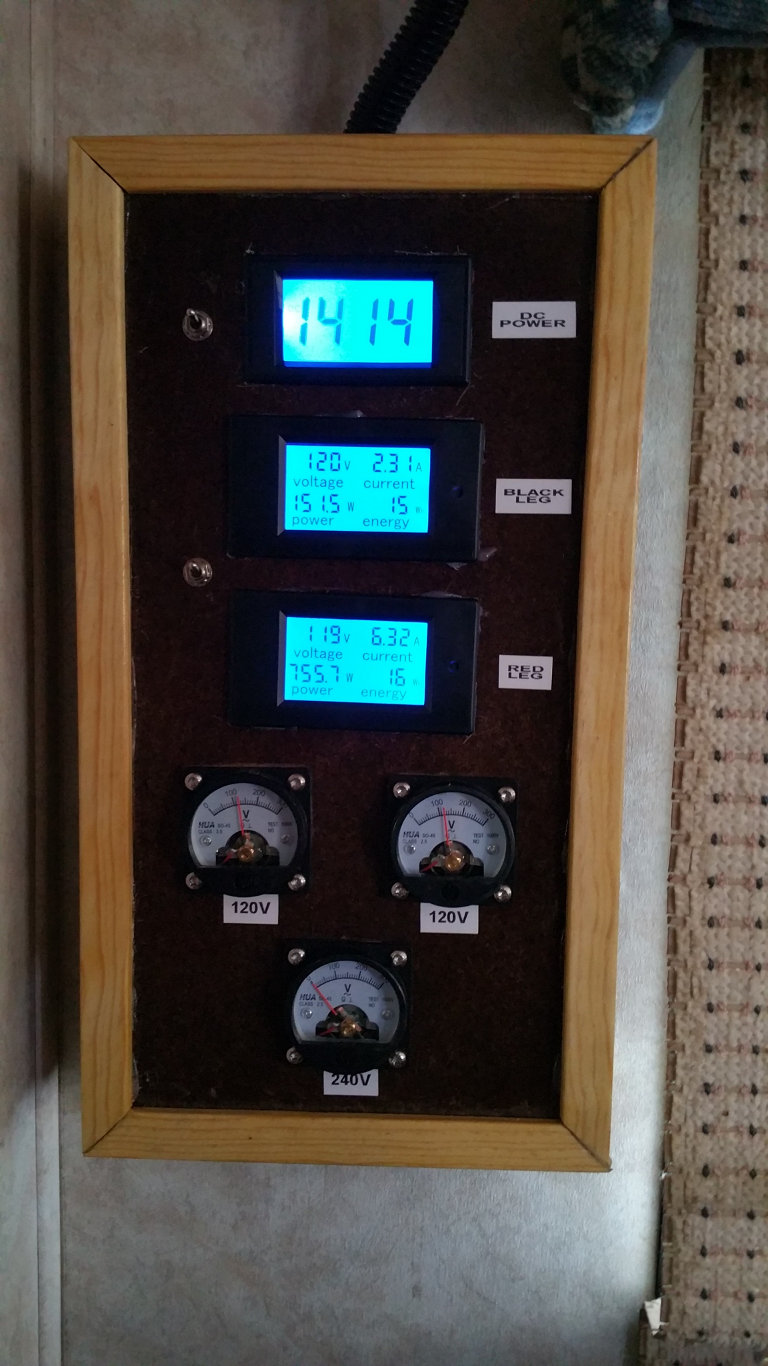
Above is the monitor panel. Because of our steampunk orientation and because of their electrically robust nature, I used analog volt meters for the unswitched power monitor.

Above is the internal wiring of the monitor panel.

Above is the load center all buttoned up and labeled.
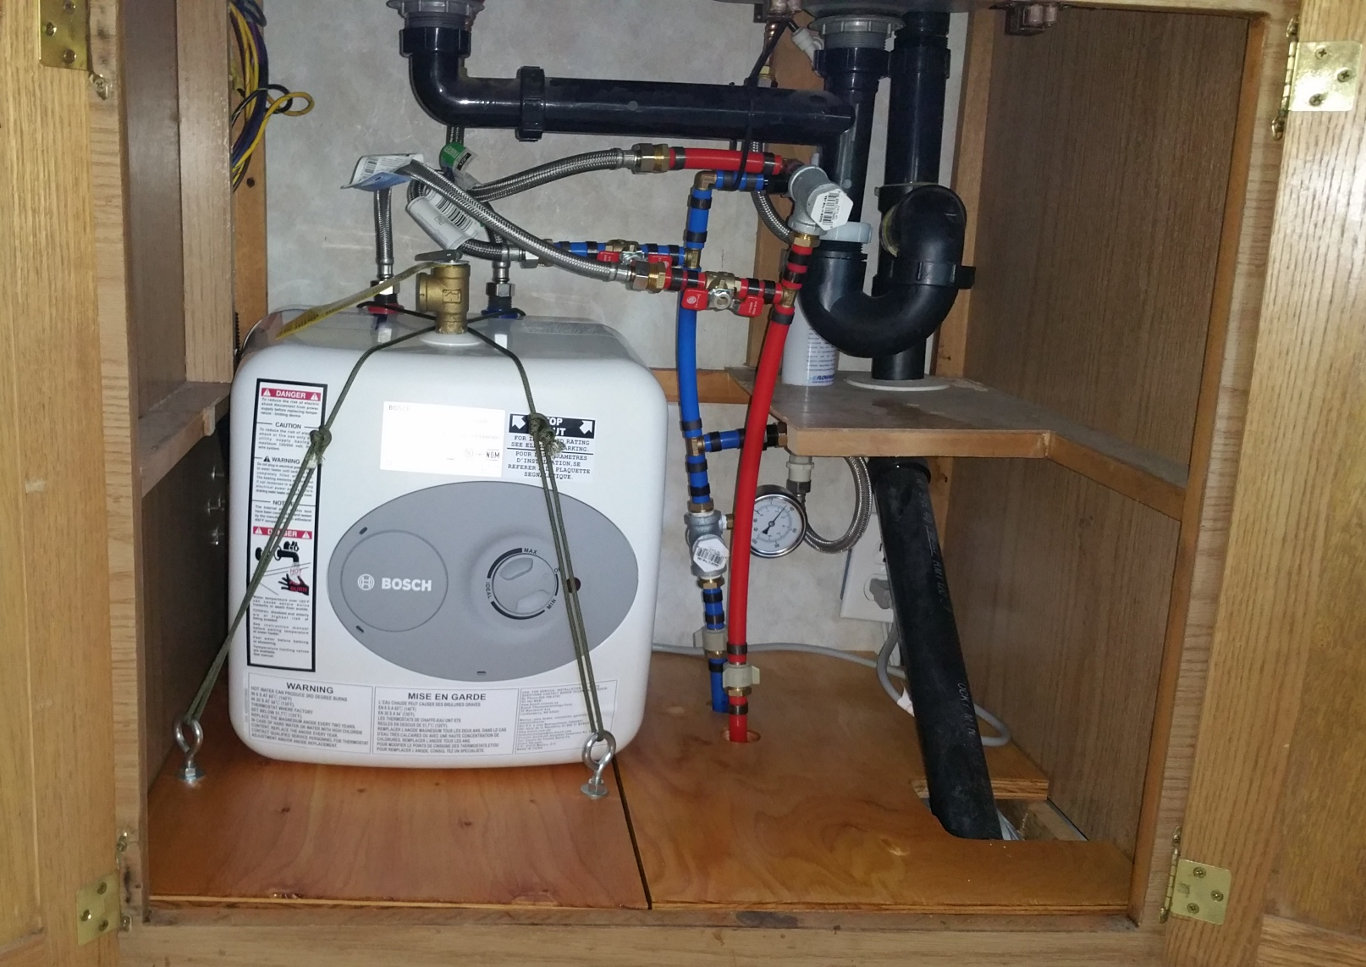
New plumbing, new water heater, new dedicated AC circuit.
Above is a view under the kitchen sink with new plumbing and a Bosch electric water heater. The Bosch is adequate if I’m careful about water use. When fully heated, it is sufficient for a “navy style” shower and laundry. Oh, I forgot to mention that I added a washing machine to the coach. Driving to the laundromat is a tremendous waste of time and money. It’s much more efficient to do laundry in the coach.
The plumbing under the sink includes a pressure gauge, which is very informative, and fittings for cold and hot water temperature gauges, which are not yet installed. As you can see, valves are provided in every location where they might be useful. The Bosch water heater, which becomes an auxiliary heater when the aft heater is installed, can be isolated by simply turning the valves.
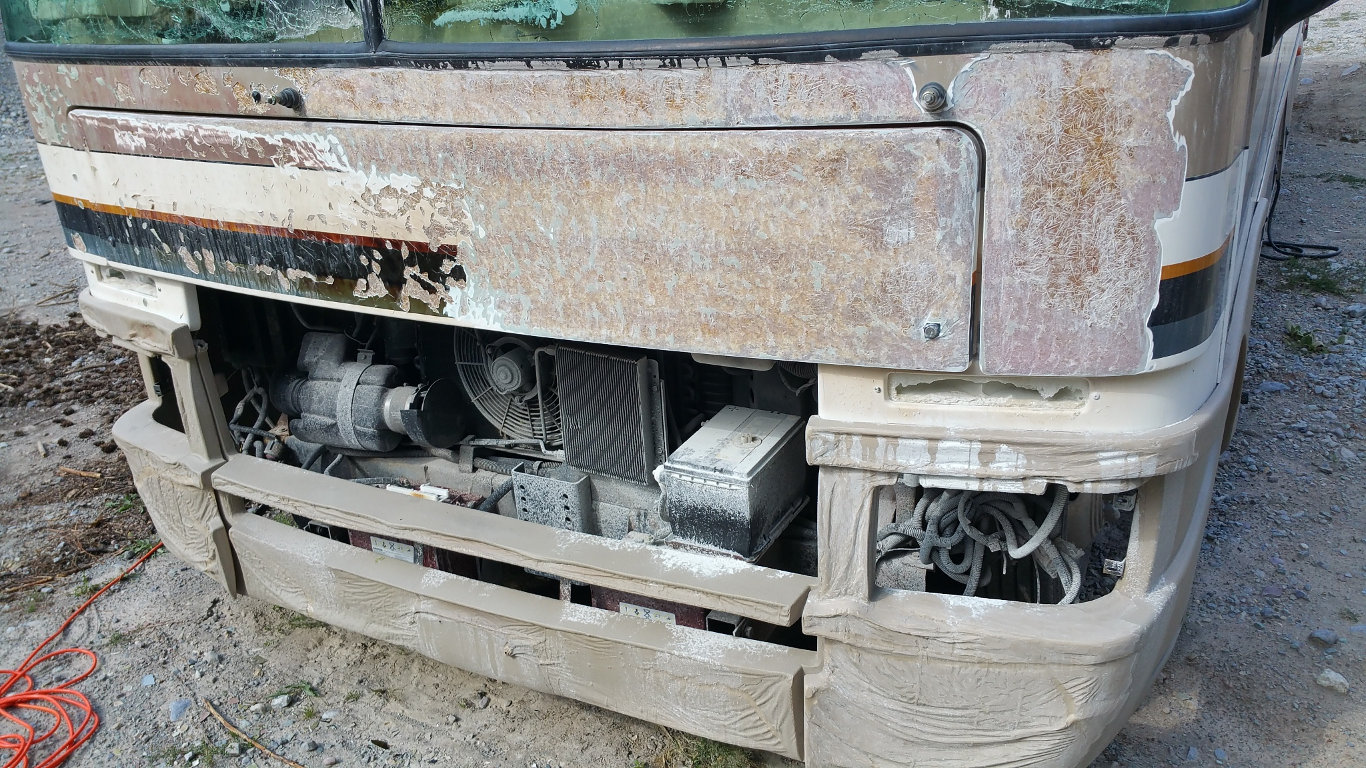
The front of the coach is fiberglass, strong and robust. This is coated with gel coat, a tough, hard, shiny material. During manufacturing, gel coat is applied to the inside of the mold before the fiberglass is applied. Heat from the fire caused much of the gel coat to crack and partially delaminate. Before repairs can be made, the damaged gel coat must be stripped off to expose the underlying fiberglass. Because its so tough, this requires many hours of abrasive grinding by hand with angle grinders. This procedure is common in boatyards and there are special machines for stripping gel coat. A typical machine of this kind is a beast that costs $5,000 and up and strips one square foot per minute. That gives an idea of how tough gel coat is.
The above photo shows the result after sufficient grinding to begin repairs. More of the textured paint on the bumpers and end caps has to be removed, but that’s easy.
The problem bearing down on me now was the approaching Montana winter. Winter can strike as early as October so the focus had to change to preparing for it. The original plan was to be out of Montana and be parked in Spokane, Washington by this time, where winter is much milder. That wasn’t going to happen. What’s more, body work on plastics shouldn’t be attempted at temperatures below 60 degrees Fahrenheit. I didn’t have an enclosed heated garage large enough for the RV, so body work had to stop.
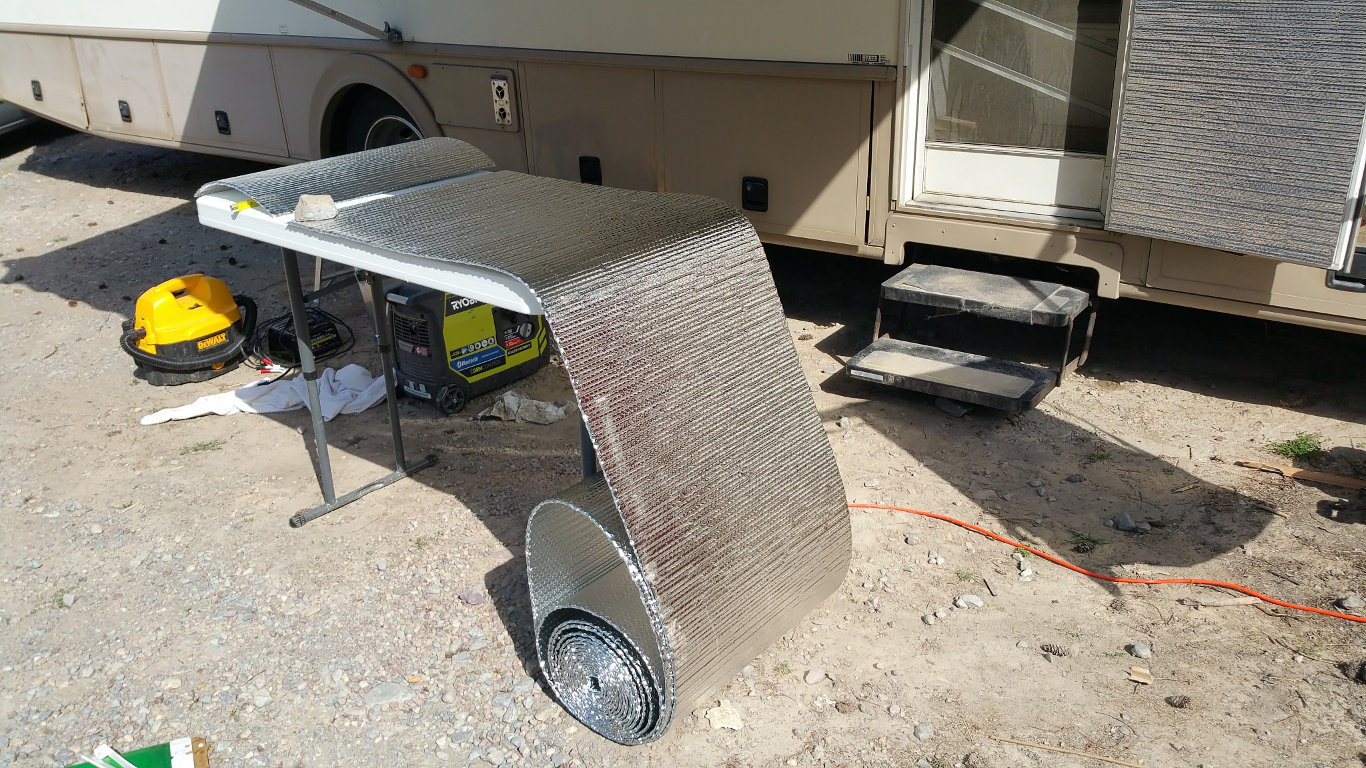
Insulation work begins
The extreme temperatures that can occur in Montana demand the best insulation one can come up with, and work began on this. Weatherstripping and other air leaks had to be sealed up. Since the propane system had a mystery leak that was not fixed, and for higher efficiency, I opted not to use the two built-in 18,000 BTU furnaces, but to use indoor rated propane heating on an a dedicated propane line running outdoors to the large tanks.
All windows were covered with Reflectix insulation. Every spot where aluminum metal reached from outdoors to indoors, like window frames and door frame had to be insulated. If you don’t, ice will build up there inside the coach. I insulated the entire door and made an air cover for the stairwell. The walls are rated R-8 so I insulated a significant amount of wall area to improve that. Even though the ceiling is R-23, the area near the heater that would see the warmest air received thick air-gapped insulation modules that raised the R-rating to around 40.
[the_ad id=”483″]
A shock was how much heat loss there was through the huge windshield. This had to be fixed, but how? At first glance, it appeared to be all complex curves — difficult shapes to match with insulation panels. But, careful examination of the dash revealed slots that must have been designed precisely for insulation panels. After measuring, I found that four rectangular panels of the right size would fit exactly, to within one or two millimeters. I used Masonite for the panels and installed insulation on both sides. I devised a means whereby the panels can be easily slid into place and plugged together with an airtight seal. It worked. Heat loss though the windshield dropped to zero. Since I didn’t want slight air leaks to result in ice forming on the windshield, I bought two large NASA blankets to cover the whole front of the coach. I installed grommets to hang them and snaps to snap them together, marine style.

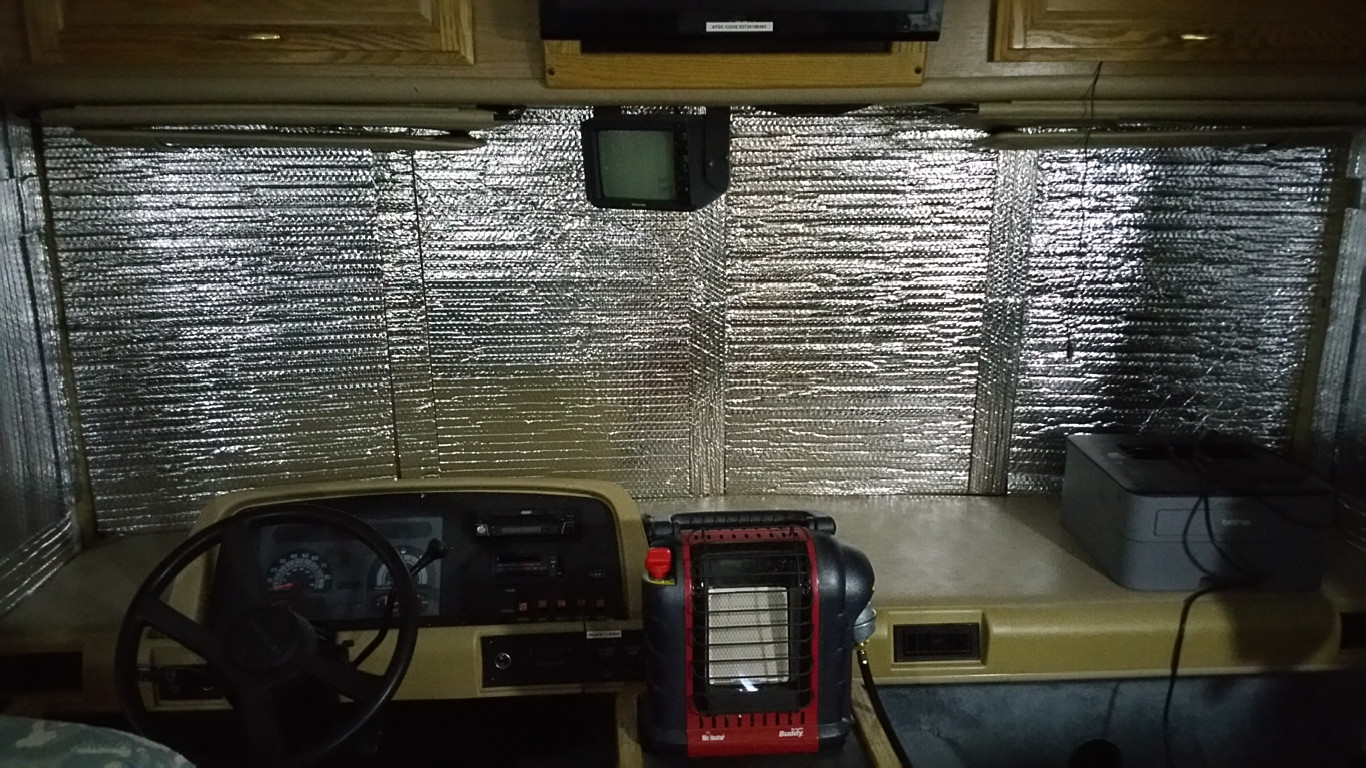
Above photos show one of the electric heaters and the windshield with insulating panels installed. The panels can be removed or replaced in less than a minute.
On cold nights, I’d hunt for air leaks by using a burning stick of incense and a flashlight, and watching the airflow. My IR thermometer gun was extremely useful. My goal was to reach a level of efficiency that I didn’t think I could actually achieve, of 1 degree F per 100 BTU/h. But I did reach it and slightly exceeded it. So heat input of 100 BTU per hour will keep the coach 1 degree Fahrenheit above the outside temperature. My indoor heater’s lowest setting is 4,000 BTU/h, which keeps the coach 40 degrees above outside temp. A 30 pound propane tank will run at this level for over 160 hours. Outside I had three tanks, 20, 30, and 100 pounds. The high setting on the heater delivers 9,000 BTU/h or 90 degrees above ambient. One electric heater on low produces 2,600 BTU/h (26 degrees) and on high 5,200 BTU/h (52 degrees). I have two such heaters. Obviously, this combination can easily deal with even record low temperatures like 40 below zero and through power failures as long as I don’t run out of propane.
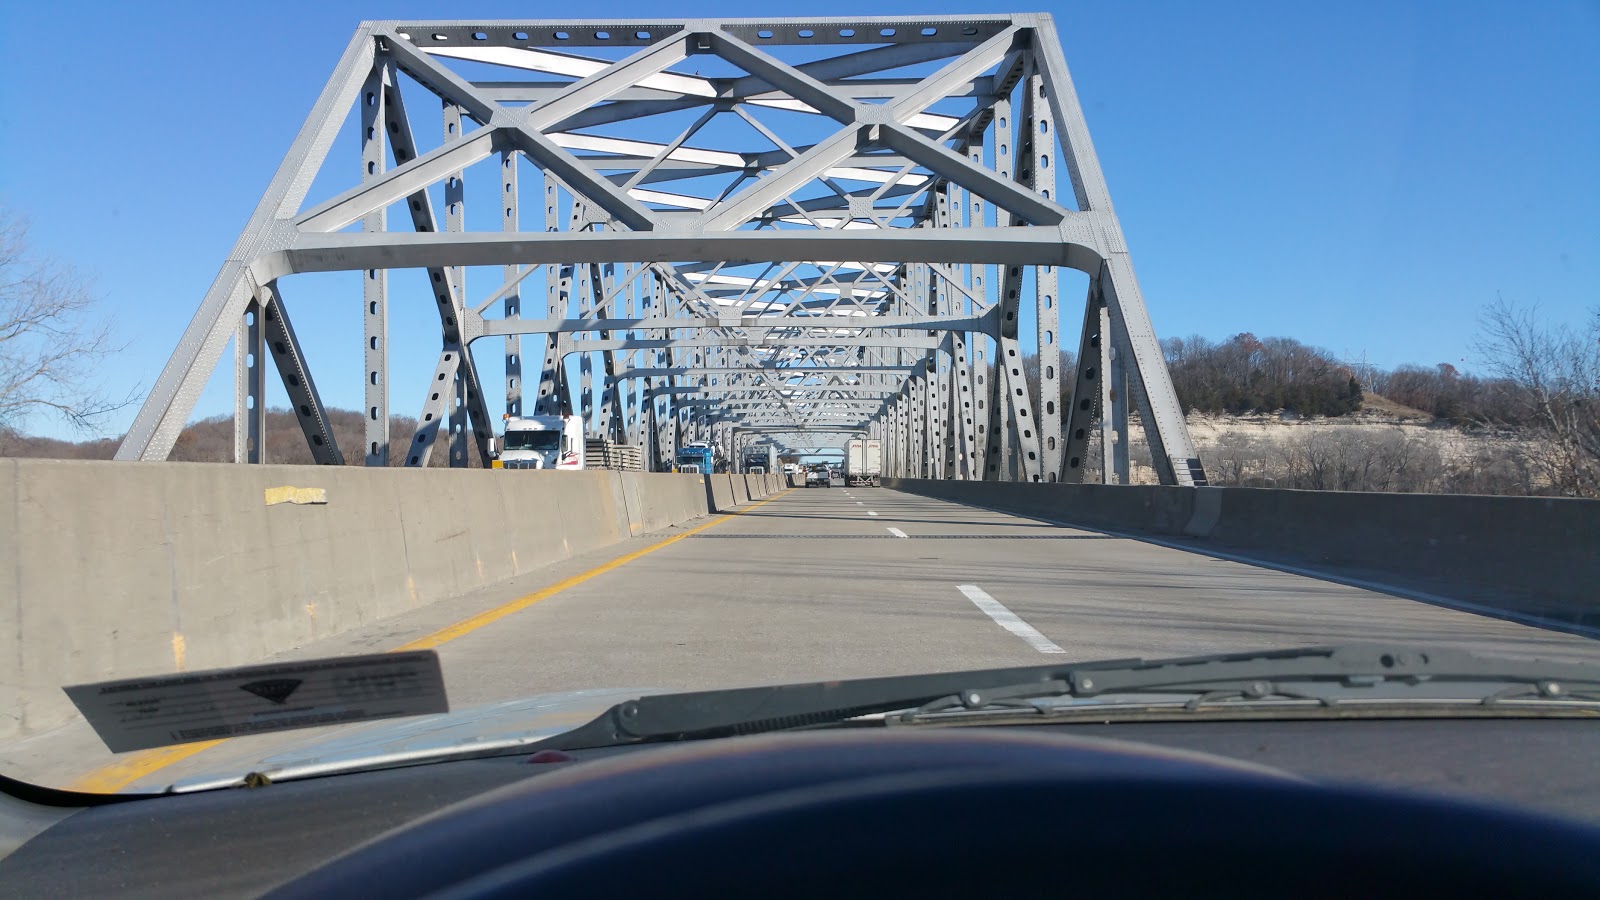
Earlier, I mentioned the “basement”. If you look at the first photo at the beginning of the article, you’ll see that all around the coach at the bottom are hatches. These are large storage compartments about 16 inches tall and very deep. Some are the full 8-foot width of the coach. The floor of the living space is above those compartments. To enter the coach from ground level, it’s five steps up to the living space floor. RVs and travel trailers with such a design are called “basement models”.
In addition to storage, the basement also contains the fresh water tank, holding tanks, water, power, and sewer hookups, generator, propane tank, and spare tire. The coach is designed to divert some heat from the two 18,000 BTU furnaces down to the basement to prevent freezing. But this assumes that you run the furnaces 24/7 in winter. I was not going to use those furnaces at all so I had to provide other means to prevent the plumbing from freezing.

I ran a dedicated switched circuit with outlets to the basement to power heat tape and small heaters. I used 200 watt personal heaters in the water tank / pump compartment and in the holding tank compartment, controlled by farm-style thermostats that turn on at 35F and off at 45F. These appeared to do a fine job. The fresh water tank held steady at 42 degrees, regardless of the outside temperature.
Another necessity in this climate is skirting to prevent icy winds from blowing under the coach and to trap warmer air under the coach. For this, I installed 46 clips around the base of the coach that allow easy installation and removal of Reflectix insulation. I installed a remote thermometer to monitor the air temperature under the coach. The only downside to skirting is local animals think that under the coach is a fine place to make a den.

Skirting, heat tape, insulation.
The above photo shows winterized hookups. I cut a custom length of fresh water hose, which is fitted with heat tape and insulated with Reflectix. The heat tape continues down the frost-free hydrant to the ground. The valve lever and spigot are covered with a bonnet also fashioned from Reflectix. This worked great. The temperature of the hydrant was 50 degrees at all times. The bonnet just slides on so it can be instantly removed to access the valve lever and then slid back on. Performance of the system is easy to measure by running water at the kitchen faucet for a minute and watching the various temperatures of the water that comes out. As the temperature goes up and down, it’s easy to see water from the pipes inside the coach, then the heated hose, then groundwater.
I did have one freeze up that took me a couple of hours to track down. I assumed that the freeze was located at the water inlet fitting on the coach. It seemed the most likely spot. But, this was wrong. I tried warming everything to no avail. Finally, I used my IR thermometer to measure every part of the system and found that the bottom inch of pipe at the base of the hydrant was at 18 degrees F. The heat tape didn’t reach down quite far enough. I figured that the steel would conduct enough heat, but no. So, I excavated the soil at the base of the hydrant and re-routed the heat tape all the way down below ground level, and filled it back in with soil. Then, I fabricated two sheets of Reflectix to cover the ground at the base of the hydrant and hold in warmth. I added a couple layers of plastic and rocks to hold it all down. It never froze up again.
So, that’s what I was up to for six months in Montana. By now, it was mid-December. None of our plans for generating money had born fruit yet and I was looking at several months of bitter cold, deep snow, and staring at the inside of the RV. Sitting around doing nothing doesn’t appeal to me so I returned to West Virginia to regroup and have another go at it later on. We’ve only had an inch or two of snow here in WV but last night the temperature was 2 degrees F. I haven’t escaped winter entirely. The irony is Montana is having an unseasonably warm winter.
Please comment below.


Recent Comments