Welcome to my musings on whatever topic catches my eye, plus stories, recipes, handyman tips, welding, photography, and what have you. Oh, and analog/digital hardware design, and software. Please comment on the blog post so everyone who visits can see your comments.

Category: Tutorial (Page 3 of 3)

Refilling a Fountain Pen Ink Cartridge


As some of you know, I am a user of fountain pens. There are all sorts of fill mechanisms for fountain pens such as levers, pistons, converters, and cartridges. My usual method is to refill cartridges from bottled ink using a syringe.

From time to time, questions come up about how to refill cartridges so I decided to make a short video of the easy procedure.

I hope this was helpful. Please comment below if you have any questions.

Making Candied Orange Peel


Making candied orange peel is easy once you learn what to watch for. Expect a couple of spoiled batches where you undercook or burn the product, but after that it’s straightforward.


Candied Orange Peel

The number of oranges to use is hard to specify. I eat two oranges a day and save the peel. Since I want as many long 1/4 to 3/8 inch wide strips that are 2 inches long, I cut the oranges in half and juice them or quarter them and carve out the inside (and eat it). Then I wash the peels under running water, and scrape as much of the meat off as I can and then toss the peels into a sealed plastic bin I have in the refrigerator. The sealed bin has a small amount of water on the bottom to keep them hydrated, otherwise the refrigerator will dry them out and they’ll shrivel.

When I have “enough”, I get the cutting board and start slicing as many long pieces as I can and I dice up the odd pieces, and continue until I have enough to fill a small 16 cm stainless saucepan about 3/4 full (but not more).

Next, the peels optionally get boiled in the saucepan. Boiling them like I describe here will reduce the flavor and remove bitterness. It will also help to hydrate any peels that have dried and thinned. You can skip the boiling steps here for a stronger orange flavor. If I’m going to use the peels for baking I skip the boiling to get a stronger flavor. To boil the peels, fill the saucepan with water, and boil for 10 minutes or more, dump them into a strainer and hit them with cold water. Then back in the pot to boil again for 10 minutes or so, dump and rinse with cold water.

Next comes the candying step. Put 2 to 2-1/2 cups of sugar in the saucepan and 1 cup of water, bring it to a boil and dissolve all the sugar. Be careful from here on because the sugar syrup will be at 240 degrees F. Treat it with respect because it WILL hurt you–think napalm. Gently add the peels to the boiling syrup, bring back to a boil, then reduce to medium heat and cook them in the syrup (uncovered). I’ve seen recipes that say to cook for 20 minutes. Forget that. It takes 40 to 45 minutes of cooking. The whole time it will be merrily bubbling and foaming. Stir occasionally to make sure nothing is sticking or burning. When you get to around 40 minutes, you’ll notice the amount of liquid is getting less and less and now is where you really have to pay attention. You want the peels to get that “glassy” candied look–not all the way through, but you want to see the flesh start to get glassy. Some people say to boil until all the syrup is gone. If you do that, you’ll burn the peels. There’s a fine line where they are “just right” and it always seems to come at around 45 minutes.

While it’s cooking, I put out sheets of waxed or parchment paper. When the decision point comes, dump the contents of the pot into a metal screen strainer (remember it’s at 240F which will melt some plastics) and let it drain for a minute. Then spoon them out onto the waxed paper and as quickly as you can spread them out so they are touching each other as little as possible. When they cool they will stick together. It’s pretty easy to unstick them from the paper but not from each other. Then let them cool off and dry for a while, an hour or two, and then you can use them or cover with another sheet of waxed paper. You can stack several batches on top of each other and store them like this for several days.

Finally, you can sprinkle them with flour and mix them into a cake. You can dip the long ones in melted chocolate (just like strawberries). You can coat them with powdered sugar, use then to garnish ice cream, whatever.

To try this out I’d recommend starting with four oranges worth of peel. The thickness of orange peels varies a lot so it’s hard to say how many oranges you need. Thick skinned oranges are great for this application. Oranges with very thin skins are not good choices for candying. You can also do this with grapefruit skins for a very different flavor.

For me, candied orange peel is one of the greatest flavors on earth, and it’s extra fun to make because you are using what would otherwise be garbage plus about 20 cents worth of sugar. However, it is labor and time intensive.

Candied Orange Peel
Closeup of finished candied orange peels.

Shooting the Moon

Caucasus Mountains, 05Aug07
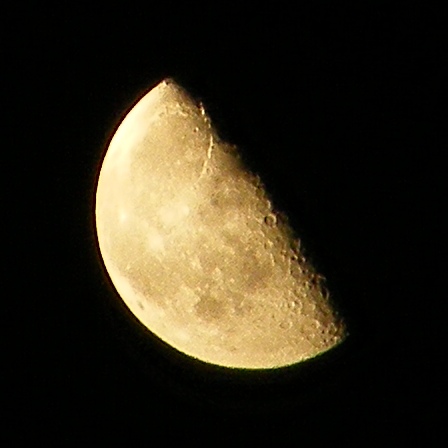
Notice the Caucasus Mountains, just east of the terminator, but still in sunlight.

It seems that a lot of people like my lunar photos, taken with a plain Fuji S700/S5700 low-cost camera, and I get a lot of questions about how I do it. So I thought I’d write up a little blog entry here with the details.

1) In order to get maximum resolution from refractive optics (your lens, in other words) you want to operate at the highest F-number you can get. This means closing the lens aperture as far as you can. On my camera f-13.5 is as high as I can go. Your lens might offer f-16, f-22, or even f-32. If so, use the highest F-number you can.

2) The most attractive moon photos can be had when the moon is between a thin crescent and first-quarter or so because you will have nice sharp shadows on the surface of the moon. Everybody likes to shoot the full moon but a full moon has no shadows and looks pretty flat and boring.

3) Because we will use a high F-number, the required exposure time will range from around 1/40th of a second for a full moon up to 1/2 second or longer for a thin crescent moon so a tripod is a requirement.

4) Use the highest resolution your camera can do. Use ASA 100 film speed in order to minimize noise from the CCD. Set jpeg compression to the highest quality and largest image, or shoot raw. If your camera has a “sharpness” setting, set it for maximum sharpness.

5) Use a delayed release on the shutter because touching the camera causes the tripod to vibrate and it takes about a second or two for the vibrations to die out after you take your hands completely OFF the camera. Just because the camera’s display does not seem to show vibration does not mean there is none. Vibrations of 2 or 3 pixels amplitude are invisible on the LCD display. I use 2 seconds, gently press the shutter release and then remove my hands completely. I also sit absolutely still. I shoot from a wooden porch usually and if I move at all the camera will vibrate. Remember that you are trying to get every pixel sharp and so the SLIGHTEST vibration will blur the image. If the wind is blowing, forget it. If you have problems with vibration, try hanging a ten pound weight from the center post of the tripod. Many tripods are equipped with hooks for this purpose. This will cut down on vibrations a lot.

Once you are ready, zoom in all the way, focus or set the lens to infinity focus, choose a trial exposure time, and see what you get. If the exposure is too dark or too light, change the shutter speed to compensate. Always leave the lens set to the highest F-number possible.

Too dark is better than too light. You can brighten a dark image fairly well in post-processing (PhotoShop or whatever) but an overexposed blown out image is useless.

Take numerous shots. Some will have vibrations that you did not perceive at the time. Bracket your shutter speeds. You might even bracket the focus if you are not sure of perfect focus. I usually take about 15 to 20 shots and hope that one or two will come out okay.

Lastly, crop the image so the moon dominates the photo and then you might try a bit of image enhancement. Use the “unsharp mask” function (Laplace transform) at very mild settings. Since you have likely cropped a 3,000 by 2,000 image down to 400 by 400, and you are going for fine details, use a small matrix. Many “unsharp mask” functions default to a 50×50 matrix and that’s way to big. Try a 4×4 or 5×5 matrix. Play with it and see if it makes it slightly better.

And that’s it. Good luck!

Moon 27Aug07 2
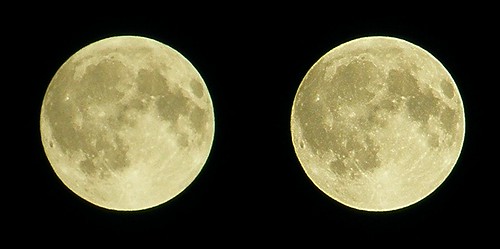
Before and after “unsharp mask” enhancement.

Newer posts »

© 2024 Shuttersparks

Theme by Anders NorenUp ↑

Find me on Mastodon